Thursday, December 29, 2011

Lemon Angel Pie


Here's one of my favorite pies!  It's actually a recipe from two different cookbooks.  The crust is from "Betty's Pies", a yummy pie shop in Minnesota that we've been to, and the filling is from the "Lion House Desserts" cookbook. 


Lemon Angel Pie


Crust:

2 large egg whites
1/8 tsp. cream of tarter
1/2 c. granulated sugar

Preheat oven to 275 degrees

Beat egg whites until frothy.  Add cream of tarter.  Beat until stiff peaks form using electric mixer on high speed.  Gradually add sugar, 2 tbsp. at a time until one half cup has been added.  Continue beating until stiff, glossy peaks form.

Grease 10-inch pie pan and spread meringue on bottom and up sides of pie pan using a rubber spatula.

Place on bottom rack in oven and bake at 275 degrees for one hour.  Turn off oven, open door ajar and let meringue cool in the oven.  Fill with desired filling.


Filling:

1/2 c. water
2 tbsp. sugar
1 egg
1 tbsp. cornstarch
1 tbsp sugar
1 1/2 tbsp fresh lemon juice
zest of 1/2 lemon
1 1/2 tsp. butter

1 c. vanilla chips
1 8-ounce package cream cheese
1/2 c. whipped cream, sweetened with a little sugar
1 tbsp. toasted almonds

Put water and 2 tbsp. sugar in saucepan and bring to a boil.  In a large bowl, mix egg, cornstarch, 1 tbsp. sugar, and lemon juice.  Slowly add hot water to egg mixture in bowl, then pour entire mixture back into pan.  heat until thickened, stirring often.  Remove from heat and add zest of lemon and butter.  Stir until mixed and cool.

Pour two-thirds of filling in bowl.  Add vanilla chips to the filling remaining in pan.  Stir until chips are melted.  Place cream cheese in bowl.  Add filling with vanilla chips to cream cheese and beat together.  Spread this mixture in bottom of pie shell.  Spread remaining two-thirds of lemon filling on top.  Chill two hours.

Top with whipped cream and garnish with toasted almonds.


(Side note: The last time we made it, we made extra of the tart lemon filling afterwards to add a little extra tartness. Yum.)

Quick and Easy Sweet Potato Casserole

I know I'm a little late, but I figured I should get this posted so I can use it the next time I randomly have a hankering for a Thanksgiving dish.  When we were preparing the dishes for Thanksgiving this year, I forgot all about the sweet potatoes until it was too late to bake them.  I decided to mix a few recipes together and made a stove top sweet potato casserole.  And if I may say, there were some at the Thanksgiving feast who don't normally like sweet potatoes and had second helpings.  So if you're looking for a quick and delicious sweet potato dish at your... next Thanksgiving meal, try this one.


Quick and Easy Sweet Potato Casserole


3-4 large sweet potatoes
3-4 tbsp. butter
1/3 c. brown sugar
cinnamon
3/4 c. pecans

Peel sweet potatoes and microwave on a plate with a little water for 5-8 minutes until soft when stuck with a fork.  When done, chop roughly.  Melt butter and sugar in dutch oven skillet.  Toss pecans in and stir on med/low heat until coated and starting to caramelize (about 3-5 minutes).  Toss in sweet potatoes and stir with spatula until well coated.  Sprinkle cinnamon to coat and continue to sauté potatoes around until ingredients are mixed in.  Sweet potatoes will mash slightly.  Pour into a glass baking dish and throw a few small marshmallows on the top (I mostly put them on because you can’t have Thanksgiving without sweet potatoes oozing with extra sugar).  I wanted to make sure everything stayed moist so I decided to shave tiny pieces of butter off of the stick and distribute them across the potatoes. Stick in oven on broil until marshmallows are slightly browned and melty.  (Do you like that word?)

Sunday, December 18, 2011

Apple Cinnamon Salad with Sweet Balsamic Dressing


Last month I helped make dinner for our Relief Society.  This was the salad I made.  I got the idea from The Sister's Cafe.  So many people complimented this salad, especially the dressing.  The recipe for the dressing makes a lot!  I doubled it and it made 8 cups of dressing.  I fed 40 women on about 2 cups of dressing.  So there was plenty left over to pass out and take home (which made many women happy).  The amounts I have here are not doubled, so it will make about 4 cups of dressing.

Apple Cinnamon Salad
adapted from: The Sister's Cafe

Your choice of Mixed Greens (I used Romaine Lettuce and a Spring Mix from Costco)
Braeburn apples
Feta Cheese
Sweet Balsamic Dressing (see below)

Sweet Balsamic Dressing

1 1/3 c. sugar
2 tsp. salt
2 tsp. dry mustard
2/3 c. balsamic vinegar
3 Tbsp. some variety of a sweet onion, chopped
2 c. canola oil
3 Tbsp. poppy seeds

In a blender, blend the sugar, salt, dry mustard, balsamic vinegar and onion until it is smooth.  Add the oil and blend it until it is thick.  Stir in the poppy seeds.  Serve it over the salad.  

Sunday, December 11, 2011

Garlic Rosemary Turkey

Do you eat turkey or ham at Christmas?  This was the recipe I used for our Thanksgiving turkey this year and even though that holiday has come and gone, I thought I'd post it, just in case you are a turkey eater at Christmas.  I tweaked this recipe from The Sister's Cafe and thought it had a great flavor.  The rosemary was delicious!  It got rave reviews from my family as well.  Our turkey was a 25 pound bird, so if yours isn't as big, you may not need all that butter mixture.  


Rosemary Garlic Turkey
adapted from: The Sister's Cafe


1/2 c. butter, softened
3 Tbsp. minced garlic
2 Tbsp. dried rosemary (or use fresh)
1 1/2 Tbsp. salt
2 tsp. pepper
1 onion, cut into fourths
4 celery stalks


In a small bowl, mix together the softened butter, garlic, rosemary, salt and pepper.  Thaw your turkey according to the package directions.  Remove all the nasty stuff that you are supposed to remove.  Loosen the skin from the turkey by shoving your fingers in between the turkey and the skin.  Do this all around the breast area, as well as the top of the thighs.  Take the butter rub in your hand and rub it all around the top of the turkey (underneath the skin).  Rub butter in the cavity of the bird as well.  In fact, I just went ahead and rubbed that turkey all over with the butter.
When the turkey is good and buttered, cook it.  I cooked my turkey in a bag.  I followed the directions on the bag for how long to cook the turkey and at what temperature.  The only thing I did differently was that I followed my mother-in-law's advice and placed the turkey on top of the celery stalks and onion slices, inside the bag.  One tip that I have is to pay close attention to the temperature of your bird while it is cooking.  It cooked much faster in the bag than we expected and so, by the time we realized and then finished up the meal preparations, the turkey was a little over cooked.  It's OK though.  My family likes it that way so that we aren't nervous the whole time we are eating that we are going to end up with salmonella.  We're a little fanatical about our poultry.   Happy Thanksgiving! (or Merry Christmas!)

Sunday, December 4, 2011

Easy Whipped Cream Truffles

I am calling these candies truffles, for lack of a better word.  They are kind of truffle-y, kind of cookie-ish, maybe somewhere in between.  I have a very distinct memory of my mom making these for a Tupperware party she was hosting, when I was a small child.  Watching her use a candy bar and a carton of cool whip (it was probably a splurge for our tight budget) and knowing that it wasn't for us, was torturous.  Ever since, they have been magical.  So, I splurged on a large Symphony candy bar, vanilla wafers and a carton of cool whip, and this time, I ate as many as I wanted and even shared a few with the kids.  There are only three ingredients, so you know this is going to be easy.


Easy Whipped Cream Truffles  
from: Lynne'


1 large chocolate candy bar (I got the biggest I could find)
1 carton of cool whip
2 c. vanilla wafers, crushed (you may need a few more, but that'll probably be enough)


In a microwave safe bowl, melt your chocolate.  I did this by cooking it 30 seconds at a time and stirring in between.  Let the chocolate cool for a few minutes.  I waited about 10 minutes and it was still slightly warm, but very stir-able.  If it is too warm it will melt your cool whip.  Add the entire carton of cool whip to the chocolate and stir it well.  When you do this, the coldness of the cool whip will start to harden up the chocolate.  Just keep stirring until it is mixed in well, knowing that you will end up with some chocolate flecks.
Put your crushed vanilla wafers in a bowl and drop the chocolate/whipped cream mixture by teaspoon full into the wafers, stirring gently to coat the entire ball.  You can make these into pretty balls if you want, I just dropped mine in the crushed cookies.  Place them onto a cookie sheet, lined with wax paper and freeze 1-2 hours, or until you are ready to serve them.  Feel free to get creative with these.  I added coconut to a portion of them, and that was good.  You could also try crushed Oreos or nuts instead of vanilla wafers. 

Sunday, November 20, 2011

Cinnamon Roasted Almonds

 
Last week I helped make dinner for our Ward Relief Society Christmas dinner (yes, we are a little early, and yes, I did encourage that).  I made a salad that I found on The Sisters Cafe.  These cinnamon almonds went on top and they were so delicious!  I will post the rest of the salad soon because it got rave reviews. You know those shops in malls, where when you walk past them, your nostrils force you to stop and taste and possibly even pay exuberant amounts of money for that delicious smelling cinnamon-y, sugary, crunchy, almond goodness?  Well, these are just like those!  Only, it's your house that smells like that!  And you aren't paying ridiculous amounts of money to eat that sugary goodness!  Aren't you happy? 


Cinnamon Roasted Almonds
1 c. white sugar
1/2 tsp. salt
2 tsp. cinnamon
1 egg white
1 tsp. vanilla
4 c. almonds


Preheat your oven to 250 degrees.  Grease well a 13X17 inch baking sheet.  I used actual shortening to grease mine.  In a small bowl, combine the sugar, salt and cinnamon and set it aside.  In a large bowl, slightly beat the egg white.  Add the vanilla and beat it until it is very frothy, but not quite to the stiff peak stage.  


Add the almonds to the egg white mixture and stir them well, until they are all coated.  Here is a little tip:  Don't add more almonds past this point.  The almonds have to be coated in the egg whites or the upcoming sugar won't stick to them.  I learned this the hard way.  
                                      
When you have your almonds nice and egg white-y, add the sugar mixture and stir it all together until they are evenly coated.  Pour them onto your greased pan and spread them evenly.  Bake for one hour, stirring them when they are halfway through.  

Sunday, November 13, 2011

Pumpkin Pecan Cake


I got this recipe a few years ago from Dustin's Aunt Julia, who is an amazing cook.  This has become one of my favorite pumpkin recipes.  It is a great alternative to pumpkin pie.  The cake-mix and pecans on top add a sweet crunchiness that is delicious.  I serve it with a little whipped cream or vanilla ice cream.


Pumpkin Pecan Cake
by: Aunt Julia


2 1/2 c. pumpkin
12 oz. can evaporated milk
1 c. sugar
3 eggs
1 Tbsp. cinnamon
1 pinch nutmeg
1 yellow cake mix
1 1/2 c. pecans
1 c. butter, melted (Just do it!  Don't think about it!)


Preheat the oven to 350 degrees.  In a large bowl combine the pumpkin, evaporated milk, sugar, eggs, cinnamon and nutmeg and mix it well.  Pour the mixture into a greased 9X13 pan.  Sprinkle the yellow cake mix over the top.  Then sprinkle the pecans over the top of that.  Then drizzle your 1/2 POUND (!!) of melted butter over the top of that.  Please do this.  You will not regret it when you taste the first bite of sweet, slightly crispy, amazingly yummy, buttery cake.  Bake it for 60 minutes, or until a fork inserted in the center comes out clean.  Serve it with whipped cream or vanilla ice cream.  It is best eaten a little warm.  

Sunday, November 6, 2011

Mom's Pork Chop Supper


In honor of my sweet mother who got in a car accident last week and broke a vertebrae in her back (We love you, Mom!), I decided to post one of her most famous meals-at least among her children: Pork Chop Supper.  It is super easy and will forever remind me of eating dinner with my family when I was young.  This can be cooked in a slow cooker or on the stove top.  As with most things, I prefer the slow cooker.  There is something so gratifying about eating dinner and not having done anything for it, at least in the last 6-8 hours (or 4-6 if it is on high!).  It makes me feel like someone else made it for me.  And most meals taste better when someone else has cooked it for you.  The other great thing about this meal is that most components of the meal are cooked together.  No need to steam veggies for the side, it is all there together!


Mom's Pork Chop Supper
by: Lynne'


4 pork chops
2 cans tomato soup
1 can water
salt and pepper to taste
4-5 potatoes
4-5 carrots
1 onion
1 Tbsp. Worcestershire sauce


In your crock pot, mix together the tomato soup, water, Worcestershire sauce, salt and pepper.  Cut the potatoes, onions and carrots into 1-2 inch chunks.  Add the pork chops and vegetables to the pot and cook for 6-8 hours on low or 4-6 hours on high.  If you cook this on the stove-top, bring it all to a boil and then turn it down to medium low heat and simmer for 1 1/2 hours, stirring occasionally.  
As a side note: the other day I made this and only had 1 can of tomato soup that wasn't extremely expired.  So I made it using 1 can tomato soup, 1 can coconut milk, 1 can tomato sauce and 2 tsp. sugar, plus the other ingredients.  It tasted wonderful!

Tuesday, November 1, 2011

Sweet and Easy Squash


This is the way that Dustin taught me to cook squash.  I usually do Acorn squash, but I have done many other kinds this way and they all taste delicious.  Although, how could anything drenched in butter and brown sugar taste anything other than delicious?!  This is similar to Nicole's awesome recipe for squash, but one big difference is that this one is done in the microwave in about 5 minutes.  So if you don't remember to get it in the slow cooker earlier, this is an easy way to cook it and make it yummy!


Sweet and Easy Squash 
by: Carolyn 


1 Acorn Squash (or any other variety with a hard outside)
2 Tbsp butter
2 Tbsp brown sugar
dash cinnamon
dash nutmeg
salt to taste


Cut the squash in half, lengthwise.  Scoop out the seeds.  Put both halves of the squash face up on a microwave safe plate.  Plop half of the butter and half of the brown sugar on both sides of the squash, in the little hole where the seeds were.  Sprinkle a little cinnamon and a little nutmeg on top of the brown sugar.  Do the brown sugar amounts to your taste.  If you want it a little sweeter, add a little more.  If not, add a little less.  Gently place a sheet of plastic wrap over the top of both sides of your squash and cook it in the microwave for 5-6 minutes, or until the squash is tender when poked with a fork.  
When the squash is cooked, let it sit for a couple of minutes until you are able to handle it a little.  Take your fork and scrape the fleshy part of the squash away from the shell part.  You can either scoop it out and serve it in another dish, or do like we often do and just leave it in the shell and eat it right out of it.  Sprinkle a little salt over the top to add a little salty to your sweet and it is delicious!  

Sunday, October 23, 2011

Crock Pot Creamy Sweet Potato Soup


Crock Pot Creamy Sweet Potato Soup
Adapted from Potato Patch Recipes

Ingredients:
2 ½  c. sweet potatoes, peeled and cut into 1 inch cubes
3 c. butternut squash, peeled and diced into 1 inch cubes
1 c. carrots, peeled and chopped
½ cup onion, chopped
1 can (14 ounces) chicken broth, divided
5-6 tbsp. butter, crumbled
1 can (13.5 ounces) coconut milk
½ tsp. ground cumin
¼-½  tsp. ground red pepper, to taste
1 ¼ tsp. of salt, or more to taste

Directions:
1.  Combine the sweet potatoes, squash, carrots, onion, butter, and half of chicken broth in your slow cooker.
2.  Cover and cook on high for 4 hours or until vegetables are tender.
3.  Puree until smooth in a blender one cup at a time, returning batches to the slow cooker. (I usually leave a little unblended to add a little texture.)
4.  Stir in the remaining broth, coconut milk, ground cumin, ground red pepper and salt.
5.  Cook on high 15 minutes or until heated through.


This recipe is the perfect comfort soup for this time of year.  It is thick and creamy, sweet with just a hint of heat from the red pepper that makes it all the more comforting.  It’s the perfect soup-in-a-bread-bowl recipe.


Sunday, October 16, 2011

Perfect Pumpkin Waffles


The other day I wanted to make pumpkin waffles.  I found this recipe on a Pumpkin Waffle Blog, and this was their ultimate pumpkin waffle recipe.  So I guessed that this was going to be the best recipe.  And I wasn't disappointed.  It had the perfect blend of pumpkin, spice and texture.  Another website had said to make apple syrup to eat with pumpkin waffles, and while I didn't have time for that, I did have a bottle of apple butter that we opened up.  The apple was really good with the pumpkin.  If you are looking for a great Fall feeling recipe, this is a good one.

Perfect Pumpkin Waffles

1/4 c. brown sugar
3 Tbsp. cornstarch
1 1/4 c. flour
1 1/2 tsp. baking powder
1/2 tsp. salt
1 3/4 tsp. cinnamon
2 tsp. ginger
1/4 tsp. cloves
1 tsp. nutmeg
2 large eggs
1 c. whole milk (I used 2%)
1 c. canned solid pack pumpkin
4 Tbsp. butter, melted

Combine brown sugar and cornstarch in a large bowl and whisk together to break apart the cornstarch.  Add the remaining dry ingredients and whisk to combine.  Separate the eggs.  In a medium bowl put the yolks, and in a small bowl put the whites.  Add the pumpkin and the milk to the yolk.  Mix it well and set it aside.  Whip the egg whites with a mixer until stiff peaks form and set it aside.  Pour the melted butter into the yolk/pumpkin mixture and mix until it is well blended.  Add the pumpkin mixture to the dry ingredients and stir it until it is combined.  Gently fold the egg whites into the rest of the batter.  
Bake in your waffle iron.  Serve with maple syrup or something 
apple-y! 

Sunday, October 9, 2011

Italian Chicken Yummy


I got this recipe from Dustin's aunt a few years ago and since it had no name, we named it Italian Chicken Yummy.  Because it is so yummy.  And it is made with Italian dressing and chicken.  It is also extremely easy and every one of my children will eat this happily.  Therefore, I make it a lot.  It is done in the slow cooker and smells so great as it cooks all day.  It is a great base recipe, so if you are missing some ingredients, you can still make it work with what you do have.  I have done it without the cream cheese and added Greek yogurt the last few minutes.  Or sour cream would work, too.  Ranch dressing can be substituted for Italian and also tastes great.  Of course, then you would want to refer to it as Ranch Chicken Yummy :).  I have also poured liquid Italian dressing in with it in place of the dry packet and that worked, too. 


Italian Chicken Yummy
by: Aunt Julia


2-4 chicken breasts, cut in half
2 cans cream of chicken soup
1 can milk
1 can water
1 (8 oz.) package cream cheese
1 Italian dressing packet


In your crock pot, combine the cream of chicken soup, milk, water and Italian dressing packet.  Soften the cream cheese in the microwave for approximately 30 seconds, or until it is soft enough to be able to stir it with your spoon (don't make it liquid, just make it soft).  Combine the cream cheese with the soup mixture.  Add the chicken.  Cook on low heat for 6-8 hours, or high for 4-6 hours.  Serve with rice.

Monday, October 3, 2011

Chocolate Chip Banana Cookies

I decided that it was time I contributed to this blog.  Kelly, one of our student clerks, brought these cookies and the recipe to work one day a few years ago, and it has become one of my favorites. 

Ingredients:
2 1/2 cups flour
2 teaspoons baking powder
1 teaspoon baking soda
1/2 teaspoon salt
2 bananas (mashed)
1/2 can evaporated milk
2/3 cup shortening
2/3 cup sugar
2 eggs
6 oz package chocolate chips

Sift dry ingredients together. (I don't sift.  I just throw them together and mix them up with a fork or a whip.)  In separate bowl, mix shortening and sugar until light and fluffy.  Add eggs to sugar mixture until well blended.  In another bowl, mix mashed bananas and evaporated milk.  Add flour and banana mixtures to sugar mixture and blend together well.  (I usually alternate adding the flour and banana mixture a third at a time - always starting and ending with the flour mixture.)  Add chocolate chips.  Bake at 400 degrees for 10 minutes or until golden brown.  (I've never baked them for more than 10 minutes, but it may vary depending on how hot your oven is.)


I made them with the boys in December, and I think they liked them!

Sunday, October 2, 2011

Easy Pumpkin Cookies

Since we are on the subject of ridiculously easy things to make, I thought I'd throw in this one right now.  These pumpkin cookies taste like the expensive ones you can buy in the store (think 6/$3.99) and only take about 2 minutes to whip up--plus the bake time.  They require only three ingredients:

pumpkin, a spice cake mix and chocolate chips (the smiling boy and Halloween decorations are not required, but are highly recommended!).  We have another recipe for pumpkin cookies that is the fully from scratch method, which is delicious, but if you are in a real hurry (or just a little lazy, like I get), these are so easy to mix together and you still get that delicious, spicy fall smell filling your home.


Easy Pumpkin Cookies
from: allrecipes.com


1 spice cake mix
1 15 oz. can of pumpkin puree
1 c. chocolate chips


Pour the cake mix and pumpkin puree into a large bowl and mix until well combined.  Add the chocolate chips and stir it well.  Drop by tablespoon full onto an ungreased cookie sheet and bake at 350 degrees for 18-20 minutes.

Sunday, September 25, 2011

Easy Slow Cooker Chicken Tacos


These are easy.  These are so easy that I made a new label: ridiculously easy.  Because they are done in the slow cooker, they aren't fast, so don't confuse the two.  You do need a good 4-6 hours to cook these, but the prep time is only as long as it takes you to defrost some chicken.  Unless you start your chicken frozen in the crock pot.  Do any of you do that?  Would I die from salmonella if I did that?  Because I'm not going to lie to you, I'm pretty darn lazy and if I didn't have to defrost my chicken first, these would be labeled "hysterically, ridiculously easy".  So throw some chicken, broth and taco seasoning in your crockpot, cook it, shred it, serve it with your favorite taco fixins' and feel so happy that you made a meal that was so ridiculously easy!


Shredded Chicken Tacos
from: BFF Jacque


1 c. chicken broth
1 pound chicken breasts
1 package taco seasoning


Pour the chicken broth into your slow cooker.  Dissolve the taco seasoning in the broth.  Put the chicken in and cook it on high for 4 hours or low for 6-8 hours.  After it has cooked, shred the chicken with a fork.  Serve it however you like your tacos!

Banana Almond Muffins


So my good friend from work also loves to bake and she has given me a few awesome recipes that I will be keeping and making for a long time.  One recipe that she loves to make, and luckily loves to share with us the next day:), is this yummy muffin recipe.  They are sweet and filling and perfect for breakfast or brunch!  The original recipe calls for macadamia nuts, but my friend makes them with almonds and I didn't want to mess with something so perfect.  (She actually uses whole almonds but I had slivered on hand, so depending on the amount of crunch you want, you could always coarsely chop some whole almonds for the top instead.)  And if I'm completely honest, I accidentally added a little too much pineapple and I was scared it would be too thin, but they turned out perfect and I liked the added sweetness.


Banana Almond Muffins
adapted from Stasha Wampler

Yields: 2 dozen

Ingredients:

3 c. flour
2 c. sugar
2 tsp. ground cinnamon
1 tsp. baking soda
1 tsp. salt
3 eggs
1 c. canola oil
1 tsp. vanilla extract
3 medium ripe bananas, mashed
1 c. flaked coconut
1 can (8 oz.) crushed pinapple, drained
1 c. almonds, whole (coarsely chopped) or slivered


Directions: 

In a large bowl, combine the flour, sugar, cinnamon, baking soda, and salt.  in another bowl, combine the eggs, oil, and vanilla.  Stir into dry ingredients just until moistened.  Fold in the bananas, coconut, and pineapple.

Fill greased or paper-lined muffin cups two-thirds full.  Sprinkle with nuts. (Be generous.)  Bake at 375 degrees for 18-20 minutes or until a toothpick comes out clean.  Cool for 5 minutes before removing from pans to wire racks.


Don't wait to make these!  You won't regret it.

Crispy Eggplant Parmesan


Before this recipe I had never tried Eggplant Parmesan (in all honesty, I had never eaten eggplant at all) and so when a friend gave me one of her eggplants, fresh from her garden, I decided to see why people actually like it so much.  (I mean it’s a weird, squeaky veggie in place of meat.)  Everyone told me how much they love Eggplant Parmesan, and so as I was searching for a great recipe online, I found this one that the people raved about in the reviews, and now I see why.  It was really delicious, and to tell you the truth, I absolutely loved the eggplant in it!  I even preferred it over chicken (although my husband will always prefer everything with meat:)

One note I will add about this recipe is that in the end, there wasn’t enough sauce to use for our pasta as well.  I added some of our favorite tomato-basil pasta sauce from a jar to eat over our pasta. (We like a lot of sauce in our family.)  So if you’re planning on eating it with pasta, I would either double the sauce or have an extra jar on hand if you need more.


Crispy Eggplant Parmesan
Adapted from Food Network.com

Ingredients:

1 tbsp. canola oil
1/2 medium onion, chopped
1/2 tbsp. chopped garlic
Dash red pepper flakes (to taste- I like it less spicy)
1 tsp. Italian seasoning
½ can crushed tomatoes (or 2-3 fresh tomatoes)
Kosher salt and freshly ground black pepper
1/4 cup flour
1 egg
1/4 cup water
1/2 cup dried Italian bread crumbs or Panko mixed with Italian seasonings
1/4 cup cornmeal
2 tbsp. grated Parmesan, divided
1 eggplant
1/2 cup shredded mozzarella cheese
2-3 tbsp. chopped fresh basil

Directions:

In a large pot over medium-high heat, add the canola oil. Add the onion and cook until softened, about 5 minutes. Add the garlic and red pepper flakes and cook for 1 minute. Add the 2 teaspoons Italian seasoning, tomatoes and season with salt and pepper, to taste Bring to a simmer and let cook for 10 minutes. . (I used fresh tomatoes and allowed to simmer for 30 minutes.  I also added fresh basil.)

Preheat oven to 375 degrees F.

Set up a breading station using 3 baking dishes. In the first dish, add the flour and season with salt and pepper, to taste. In the second dish whisk the eggs with 1/4 cup water. In the third dish combine the bread crumbs, cornmeal, 1 tablespoon Parmesan and season with salt and pepper, to taste. Slice the eggplant into 3/4-inch slices. Dredge them in flour, then in the egg wash and then in the bread crumbs.

Set a cooling rack on top of a cookie sheet and arrange the eggplant slices on the cooling rack.  Bake in oven until crispy, about 30-35 minutes

Turn the oven to broil. Put the eggplant, overlapping, into a baking dish. Cover eggplants with about a cup of sauce and sprinkle with the mozzarella cheese and remaining tablespoon of Parmesan. Put under the broiler until the cheese is melted and bubbling, about 3 to 4 minutes. For last minute under broiler, sprinkle fresh basil on top to garnish.

Serve over linguine pasta with remaining sauce.  Enjoy!


Saturday, September 24, 2011

Honey Lime Chicken Enchiladas


This is my go-to dish when I need something easy and delicious!  I love these enchiladas, my husband loves them, and usually anyone that tries them wants the recipe.  As I’ve mentioned before, I don’t love to make the same thing all the time, but this dish is one exception.  These are a regular at our house!


The Sisters’ Café is one of my favorite blogs to get awesome recipes (like the Brie en Croute!!).  When I make these, I like to add black beans inside the enchiladas.  This adds a nice texture and flavor, but it also helps the chicken go a lot further!


Honey Lime Chicken Enchiladas
Adapted from The Sisters’ Cafe


Ingredients:
1.5 lbs pork or chicken, cooked and shredded

Sauce:
1/3 c honey
1/4 c lime juice
1 Tb chili powder
1/2 tsp garlic powder

2 (10 oz) cans green enchilada sauce
1-2 cans black beans
Equal parts mixed together of:
mozzarella cheese, shredded
cheddar cheese, shredded

flour tortillas
sour cream & salsa

Directions:
Mix together sauce ingredients then add to shredded pork or chicken. Let the sauce soak into the meat for about 30 minutes.
Lightly spray 2 pans with non-stick baking spray.  (I usually fill a 9x13 and a 9x9. It may vary depending on how much chicken you put in each one.) Pour green enchilada sauce into pans to coat the entire bottom. Fill tortillas with shredded meat, black beans, and desired amount of cheese. Roll and place in dish.
Pour remainder of sauce over enchiladas and sprinkle a generous amount of cheese on the top! Bake uncovered at 350 degrees for 30 minutes. Then turn on broiler and place enchiladas nearer the top of oven. Let it broil until cheese is slightly brown and crispy.
To serve, top with sour cream and salsa.  Delicious!


Sunday, September 18, 2011

Coconut Tres Leches Cake

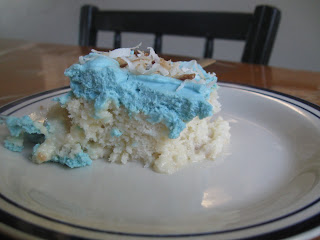
One day, as I was looking for something yummy to make, I stumbled upon a recipe for coconut tres leches cake.  The pictures looked so delicious that I couldn't stop thinking about it.  I've been waiting for a reason to make it and finally, yesterday I decided to make it to take to a potluck Utah/BYU football game party.  There were not many supporters of our Alma Matter (we were 3 out of 18), but this cake was so good that even those die hard Ute fans were willing to stain their mouths with the blue frosted tres leches cake.  They even appreciated the Y made out of bananas on top (which I forgot to take a picture of).  The fact that BYU lost miserably probably helped in their desire to eat it.  Good thing, or they would have missed out.  It was amazing.


Coconut Tres Leches Cake
adapted from: www.melskitchencafe.com


Cake
1 white cake mix made according to package directions


Milk Syrup
1 can (15 oz.) cream of coconut*
1 can (12 oz.) evaporated milk
1 c. heavy whipping cream
1 tsp. vanilla


*cream of coconut is NOT coconut milk.  You find it in the mixer section of your local grocery store.  It is in a small, skinny can.


Sweetened Cream Topping
2 c. heavy whipping cream
1/2 c. powdered sugar
1 tsp. vanilla
1 banana, sliced
1/4 c. shredded coconut, toasted (you can do this in a frying pan, on med-low heat, stirring constantly.  It takes just a couple of minutes) 


Make the cake according to the package directions and let it cool about 1 hour.  After the cake has cooled, in a blender combine the cream of coconut, evaporated milk, whipping cream and vanilla and blend it until it is smooth.  Once the cake has cooled, poke it all over with a fork.  Now here is a little tip on this: while you do need to poke it all over, don't poke all the way to the bottom of the pan.  Based on the pictures on the other websites I looked at, it looks like they left a very little un-poked cake on the bottom.  This allowed theirs to retain some shape.  While mine tasted muchos delish, it was definitely your typical tres leches, falling apart all over the place.  I wouldn't leave a lot of space on the bottom (like maybe less than 1/8 inch) (ha ha!  Like you can really tell how close you are to the bottom of the cake!).  Forget it, just do your best!  It will taste heavenly, even if it does begin to resemble cake soup.   
Back to our milk syrup:  once the cake has cooled, and been stabbed all over, pour your milk syrup smoothie all over it.  Pour a little at a time, allowing the syrup to sink down into the holes before you add more.  Otherwise it splashes out onto your shirt and floor.  Trust me.  Save just a tiny little bit for you to drink directly out of the blender, because it is soooo delicious.  Trust me, again.  
Cover the cake loosely and pop it in the fridge until all of the syrup absorbs into the cake, about 2 hours.  One website said to let it refrigerate overnight, and that could be a good idea.  It may set up a little more that way.  After your cake has chilled to your desired chilliness, pour the 2 c. heavy whipping cream into a glass bowl (preferably chilled, also) and beat it on high with an electric mixer for 1 1/2 minutes until it begins to thicken.  Stop the machine and add the powdered sugar and vanilla and beat it on high again until stiff peaks form, 1 to 2 minutes longer.  Spread it on top of your cake.  This makes quite a bit of frosting, so you may end up with a little left over.  Or, just pile it all on.  Top the cake with sliced bananas and toasted coconut.  Feel free to put your bananas in the shape of whatever letter you choose.  It doesn't have to be a Y.  It just tastes better that way.