Showing posts with label cake. Show all posts

Sunday, June 28, 2015

Ice Cream Turtle Cake, And A Small Vanilla Cake

For Avery's birthday this year she wanted this mint ice cream turtle cake.  It was super easy, and if it had a real flaw, it was that it melted as fast as I was putting it together.  I guess we can't blame the cake for that as much as my 78 degree house.  You may want to keep your house a little colder while you are making it...  As you would expect, Martha Stewart's cake looked a little better than mine.  But, the child was happy, so I was happy!  There is a cake inside the ice cream, so make sure you prepare that in advance.
Ice Cream Turtle Cake
from: marthastewart.com

Mint Chocolate Chip Ice Cream
Chocolate Ice Cream
candies for eyeballs
1 prepared vanilla cake (recipe follows)

Vanilla Cake
1 stick of butter, melted
1 1/4 c. flour
3/4 c. sugar
1 tsp. baking powder
1/4 tsp. salt
1 egg, plus 1 egg yolk
1/3 c. milk
1 tsp. vanilla

For the vanilla cake, preheat the oven to 350 degrees.  Grease and flour an oven proof, 7 inch diameter, glass bowl.  In a mixing bowl, stir all your dry ingredients together.  Add the egg and yolk, milk and vanilla and stir until it is almost combined, about 1 minute.  Mix in the melted butter.  On medium speed, mix it for 30 seconds.  Pour it into your prepared bowl and bake it for 30 minutes, or until a toothpick inserted in the center comes out clean (mine actually took close to an hour to bake).  Once it has cooled, gently run a knife around the edges and pop it out.  Wrap it in plastic wrap and put it in the freezer until you are ready for it.
For the turtle shell, scoop about 30 scoops of mint ice cream onto a baking sheet, and then freeze it for about 45 minutes.   Line a 12 cup bowl with plastic wrap.  Fill the bowl with the scoops of ice cream, rounded side out.  Lay them all around the bowl.  
Now that your bowl is lined with ice cream scoops, take your frozen cake and place it in the bowl, with the rounded part down.  Take more of your mint ice cream, and spread it along the bottom of the cake, until it is all covered.  Cover it with plastic wrap and freeze it for at least 4 hours.  Flip it upside down onto a serving pan, so the flat side is down.  Using an ice cream scoop, scoop out a spot on the turtle for a head and feet.  Put a scoop of chocolate ice cream on for the head and legs, and then give it some eyes, using your candy.  Serve it immediately, preferably in a house lower than 78 degrees! 

Sunday, February 1, 2015

Coconut Cake

My sisters and I made this dessert one night when Nicole was in town.  As I am obsessed with all things coconut right now, it sounded delicious.  It was delicious.  However, there are a few changes that I will make when I make it again someday.  And I am going to put them into the recipe. One thing is that the original recipe calls for almond extract, but I thought it overpowered the coconut flavor.  So I say, leave it out! Or even add some coconut extract.  Also, I made mine in a bundt cake pan, but it would be so yummy as a layered cake, with whipping cream in between each layer.  Mmmm.  

Coconut Cake
adapted from: allrecipes.com

3 c. cake flour
2 1/2 tsp. baking powder
1/2 tsp. salt
1 c. butter, softened
2 c. white sugar
4 eggs
1 c. coconut milk
1 tsp. vanilla
1 tsp. coconut extract (optional)
1/2 c. shredded coconut
fresh whipping cream for topping

In a medium bowl, stir together the flour, baking powder and salt.  In another bowl, mix the butter and sugar until fluffy.  Stir in the eggs, one at a time.  Alternate stirring in the flour mixture and the coconut milk until it is all added and well combined.  Stir in the vanilla, coconut extract and shredded coconut.  Pour your batter into a greased and floured cake pan and bake it at 375 degrees for 20 minutes, or until a toothpick inserted into the center comes out clean.  After it has cooled, serve it with fresh whipped cream.   

Wednesday, August 20, 2014

The Easiest Chocolate Chip Cookie Bars Ever

One of those yummy recipes came across my Facebook feed yesterday, and I couldn't resist.  This is seriously easy.

1 yellow or white cake mix (I used yellow)
2 eggs, beaten
5 Tbsp butter, melted
2 cups mini chocolate chip cookies (although I'll try it with regular chocolate chips next time)

Mix everything together and spread into a greased 11 X 13 baking dish
Bake at 350 for 20 minutes.

Cool, cut and devour.  So good!  I'll edit and add a picture when I make these again.

Sunday, April 6, 2014

Jello Poke Cake

This is a classic recipe for a jello poke cake.  Did everyone's mom make this when they were growing up?  It definitely reminds me of my mom.  The other day I needed to make dessert on St. Patty's Day.  I was going to make coconut tres leches cake, which is fabulous, but I ran out of steam with my busy day.  Instead, I did this poke cake, using lime jello.  It was an easy way to do a lightly sweet, delicious cake, and it was green!  Perfect!

Jello Poke Cake
this is really from my mom, but I got my measurements from kraft.com

1 white cake mix
1 package (3 oz) jello, any flavor that you want
1 c. boiling water
1/2 c. cold water
1 tub whipped topping

Mix and bake your cake, according to the package directions.  Let the cake cool.  Using a fork, poke the cake all over.  In a bowl, mix the jello with the 1 cup of boiling water.  Stir it for 2 minutes, or until it is completely dissolved.  Stir in the cold water.  Pour the liquid jello all over the cake.  Put it in the fridge for a few hours.  Spread your whipped topping over the top before you serve it.

Sunday, March 30, 2014

Super Moist Almond Poppy Seed Bundt Cake (Which Can Be Done Gluten Free!)


My mother-in-law is gluten intolerant.  She is in town this week and so we tried out a new cake one night.  This is a semi-homemade cake, and it is really only gluten free because of the gluten free cake mix that she bought.  You could make the cake non-gluten free by using a regular old cake mix.  And it would probably still be delicious.  But, if you can't do gluten, this ended up being easy, moist and delicious.  My mother-in-law says she will never make gluten-free cake any other way now!

Almond Poppy Seed Bundt Cake
adapted from: allrecipes.com

1 yellow cake mix (we used a gluten free cake mix)
1 package instant vanilla pudding (the small box)
2 Tbsp. poppy seeds
1 c. water
1/2 c. oil
4 eggs
2 tsp. almond extract

Almond Glaze
I didn't really measure my ingredients for this glaze, but I used appoximately:
2 c. powdered sugar
2 Tbsp. milk
1 tsp. butter
1/4 tsp. almond extract
1/2 c. sliced almonds

Preheat your oven to 350 degrees.  Grease and flour a bundt cake pan.  In a large mixing bowl, stir together the cake mix, pudding mix and poppy seeds.  Make a well in the center and add in the water, oil, eggs and almond extract.  Mix it for 30 seconds on low speed and then 4 minutes on medium speed.  Pour it into the cake pan.  Bake it for 45 minutes, or until a toothpick inserted into the center comes out clean.  Let it cool completely before removing it from the pan.
In a small bowl, mix together the powdered sugar, milk, butter, almond extract and stir it until it is smooth. Drizzle it over your cooled cake.  In a small frying pan, toast the almonds over medium heat until light brown.  Then sprinkle them on your cake.

Sunday, December 9, 2012

Smooth & Creamy Coconut Cake


I made this for a Christmas party this weekend.  It is a delicious cake, even if you are not a huge coconut fan.  The coconut flavor is mild and creamy and by only lightly sweetening the topping, it is a great compliment to an already sweet enough cake.  Plus, it looks so snowy and festive with the coconut all over it!  It is a great Christmas-y cake.

Smooth & Creamy Coconut Cake
adapted from: allrecipes.com

1 white cake mix
1 15 oz. can cream of coconut (not coconut milk-you find this in the mixer section of the grocery store)
2 c. heavy whipping cream
1 tsp. vanilla
1/4 c. powdered sugar (maybe a little more-to taste)
1-2 c. shredded sweetened coconut

Bake the white cake according to the package directions in the pan of your choice.  I used a 9X13 pan, lined with wax paper and sprayed with cooking spray.  While the cake is cooking (or cooling) pour the heavy whipping cream into a medium bowl and beat it on high speed with an electric mixer, for 3 minutes.  Add the vanilla and powdered sugar and beat it until stiff peaks form.  Put it in the fridge until you are ready for it.  When the cake is done, cool it completely, then slice it in half for a layered cake (or leave it as is, or if you have 2 round cake pans, ignore this instruction).  Place one layer, face down, on your serving platter.  Using a fork, gently poke holes all over the cake, but don't poke all the way to the bottom of the cake.  Pour 1/2 of the can of cream of coconut on the top of the cake, and using a knife, spread it and kind of work it into the holes.

Apply a thin layer of your prepared heavy cream.  Lay the other layer of cake on top of that one and poke holes all over it, also being careful not to go all the way through the layer.  Now do the same thing with the second half of the cream of coconut.  Spread the rest of the heavy cream on the top and sides of the cake.  Using your hands, gently press coconut all around the top and sides of the cake.  Store it in the fridge and serve it chilled.

Sunday, December 2, 2012

4-Layer Red Velvet Cake with Cream Cheese Whipped Cream Frosting


I had a birthday.  And I wanted to make my own cake.  I've never done that before, but it may be a new tradition that I've started.  I picked a cake that I thought sounded delicious, but that I knew none of my other family members would let me make for their birthdays.  And doesn't a 4-layer red velvet cake with cream cheese whipped cream frosting sound lovely?  It was lovely.  And, as a side note, not one of my children even tasted this cake on my birthday.

4-Layer Red Velvet Cake
adapted slightly from: Joyofbaking.com

2 1/2 c. sifted cake flour (I used a little more than 2 c. flour and a little less than 1/2 c. cornstarch as a substitute)
1/2 tsp. salt
2 Tbsp. cocoa
1/2 c. unsalted butter, softened
1 1/2 c. sugar
2 eggs
1 tsp. vanilla
1 c. buttermilk
2 Tbsp. red food coloring (I did not use this much)
1 tsp. vinegar
1 tsp. baking soda

Preheat oven to 350 degrees.  Line two round pans with wax paper or parchment paper and spray with cooking spray.  I actually used my 9X13 pan and when the cake was done I cut it into fourths.  In a bowl, mix together the flour, salt and cocoa.  In another bowl, beat the butter for 1 to 2 minutes.  Then add the sugar and mix it for another 3 or 4 minutes.  Add each egg, mixing it well after each one.  Add the vanilla and beat it all until it is light and fluffy.  In a measuring cup, mix the buttermilk and the red food coloring.  Alternately add the flour mixture and buttermilk to the butter mixture in three additions (you better not make it four, or else! :).  In a small cup, stir together the vinegar and baking soda and let it fizz.  Then fold that into the batter.  Quickly pour the batter into your prepared pan(s) and bake it for 25 to 30 minutes or until a toothpick inserted in the center comes out clean.  When the cake is done, cook it completely, then gently tip it upside down and dump it out of the pan.  Carefully peel the wax paper off, wrap the cake in plastic wrap and put it in the freezer for an hour.  This will make it easier to frost.  While that is in the freezer, make your cream cheese whipped cream frosting.

Cream Cheese Whipped Cream Frosting
adapted slightly from: Joyofbaking.com

16 oz. softened cream cheese (pop it in the microwave for about 1 minute and it will soften)
1 tsp. vanilla
1 c. powdered sugar
1 1/2 c. cold heavy whipping cream

With a mixer, beat the cream cheese until it is smooth.  Add the vanilla and powdered sugar and beat that until it is smooth and creamy.  Gradually add the heavy cream and beat it on high speed until it thickens and is spreadable.  If needed, add more sugar or cream to get the right consistency.  I actually thought the frosting could have been slightly sweeter, so taste it and add a little more sugar if you think it needs it.

When the cake is sufficiently frozen, remove it from the plastic wrap and slice it in half, horizontally.  For the 9X13 pan I cut it in half lenthwise, then cut each half in half horizontally.  Place one layer upside down on your serving platter and frost the top with the frosting.  Continue to layer and frost each layer and then frost the tops and sides of the cake.  If it is a little lopsided (like mine was), don't worry too much.  It will have four pretty layers when you cut a piece. Just don't show anyone the whole cake. (You'll notice I have no whole cake pictures on here :).  Happy Birthday!

Saturday, May 12, 2012

Homemade Chocolate Cream Filled Cookies (the best recipe!!)


I have had a number of homemade Oreo cookies in my life.  This version is, by far, the best I have had.  I made them and shared them last week, and my friend texted me something like this: "Those were the most delicious cookies!  I seriously could have taken the whole plate into my room and eaten every one of them. And I almost did!"  I feel the same way.  I got the recipe from my friend, Jen.  the same friend who gave me this lemony deliciousness.  The cream cheese frosting in the cookies helps them to be not too sweet.  I used a melon ball scooper thing to put them onto to pan and the kids had a lot of fun helping me with that.  In lieu of Mother's Day tomorrow, maybe you should make a batch, and then be sure to hide a few extra for yourself!

Chocolate Cream Filled Cookies  


2 devil's food cake mixes
1/2 c. flour
2 Tbsp. water
4 eggs
1 c. oil (I know, I  know.  Next time I may try reducing this, or substituting apple sauce for some of it.)

Cream Cheese Filling


1/2 c. butter, softened
1 lb. powdered sugar
8 oz. cream cheese, softened
1 tsp. vanilla

In a medium bowl, combine the vanilla, softenend butter and softenend cream cheese and stir it until it is well combined.  Add the powdered sugar and continue to stir it until it is mixed well (no clumps).  Let it sit in your fridge for about 30 minutes, or until it gets a little firmer.

Preheat your oven to 350 degrees.  In a large bowl, combine the cake mixes, flour, water, eggs and oil.  Using a wooden spoon, stir it all together.  Drop by tablespoonful onto a cookie sheet.  I used a melon baller.  It worked great.  Bake them for 10 minutes, remove them from the pan and cool completely.

When the cookies are cooled, spread a generous amount of the cream cheese frosting on the back side of one cookie and stick another cookie on the other side, back side in (you get this, right?).  After I had made my little cookie sandwiches, I put them in the fridge for a little longer, so that the frosting didn't all come right out as I bit into one.  That seemed to do the trick (Maybe it was unnecessary.  I didn't test it.  Hmmm.).

Sunday, March 11, 2012

Birthday Cake Waffles

Lynnette told me one day that the best french toast she had ever eaten were dipped in cake batter.  I had never heard of this, but thought it would be fun to try it with waffles (of course I did!).  As you can imagine, the kids loved them.  They affectionately named them Birthday Cake Waffles.  The only thing that could have made them better would have been a candle on top to blow out!

Birthday Cake Waffles
by: Carolyn 
1 white cake mix
1 3/4 c. white flour
1 Tbsp. baking powder
1 tsp. salt
1 1/2 c. milk
1/4 c. oil
2 eggs

In a mixing bowl, mix the cake mix according to the package directions and then set it aside.  In another large bowl combine all the other ingredients and mix it well.  Bake the waffles in your waffle iron and then set them aside.  Spray a griddle with cooking spray.  Now, take a waffle and dip it in the cake batter and cook it on the griddle (like you would french toast).  
The cake batter gets pretty thick on the waffle, and this is OK.  The more batter the merrier.  It just makes it more cake-y. 
Serve these with syrup, powdered sugar or whipped cream.  And preferably sprinkles and a candle.  Happy Birthday!

Sunday, November 13, 2011

Pumpkin Pecan Cake


I got this recipe a few years ago from Dustin's Aunt Julia, who is an amazing cook.  This has become one of my favorite pumpkin recipes.  It is a great alternative to pumpkin pie.  The cake-mix and pecans on top add a sweet crunchiness that is delicious.  I serve it with a little whipped cream or vanilla ice cream.


Pumpkin Pecan Cake
by: Aunt Julia


2 1/2 c. pumpkin
12 oz. can evaporated milk
1 c. sugar
3 eggs
1 Tbsp. cinnamon
1 pinch nutmeg
1 yellow cake mix
1 1/2 c. pecans
1 c. butter, melted (Just do it!  Don't think about it!)


Preheat the oven to 350 degrees.  In a large bowl combine the pumpkin, evaporated milk, sugar, eggs, cinnamon and nutmeg and mix it well.  Pour the mixture into a greased 9X13 pan.  Sprinkle the yellow cake mix over the top.  Then sprinkle the pecans over the top of that.  Then drizzle your 1/2 POUND (!!) of melted butter over the top of that.  Please do this.  You will not regret it when you taste the first bite of sweet, slightly crispy, amazingly yummy, buttery cake.  Bake it for 60 minutes, or until a fork inserted in the center comes out clean.  Serve it with whipped cream or vanilla ice cream.  It is best eaten a little warm.  

Sunday, September 18, 2011

Coconut Tres Leches Cake

One day, as I was looking for something yummy to make, I stumbled upon a recipe for coconut tres leches cake.  The pictures looked so delicious that I couldn't stop thinking about it.  I've been waiting for a reason to make it and finally, yesterday I decided to make it to take to a potluck Utah/BYU football game party.  There were not many supporters of our Alma Matter (we were 3 out of 18), but this cake was so good that even those die hard Ute fans were willing to stain their mouths with the blue frosted tres leches cake.  They even appreciated the Y made out of bananas on top (which I forgot to take a picture of).  The fact that BYU lost miserably probably helped in their desire to eat it.  Good thing, or they would have missed out.  It was amazing.


Coconut Tres Leches Cake
adapted from: www.melskitchencafe.com


Cake
1 white cake mix made according to package directions


Milk Syrup
1 can (15 oz.) cream of coconut*
1 can (12 oz.) evaporated milk
1 c. heavy whipping cream
1 tsp. vanilla


*cream of coconut is NOT coconut milk.  You find it in the mixer section of your local grocery store.  It is in a small, skinny can.


Sweetened Cream Topping
2 c. heavy whipping cream
1/2 c. powdered sugar
1 tsp. vanilla
1 banana, sliced
1/4 c. shredded coconut, toasted (you can do this in a frying pan, on med-low heat, stirring constantly.  It takes just a couple of minutes) 


Make the cake according to the package directions and let it cool about 1 hour.  After the cake has cooled, in a blender combine the cream of coconut, evaporated milk, whipping cream and vanilla and blend it until it is smooth.  Once the cake has cooled, poke it all over with a fork.  Now here is a little tip on this: while you do need to poke it all over, don't poke all the way to the bottom of the pan.  Based on the pictures on the other websites I looked at, it looks like they left a very little un-poked cake on the bottom.  This allowed theirs to retain some shape.  While mine tasted muchos delish, it was definitely your typical tres leches, falling apart all over the place.  I wouldn't leave a lot of space on the bottom (like maybe less than 1/8 inch) (ha ha!  Like you can really tell how close you are to the bottom of the cake!).  Forget it, just do your best!  It will taste heavenly, even if it does begin to resemble cake soup.   
Back to our milk syrup:  once the cake has cooled, and been stabbed all over, pour your milk syrup smoothie all over it.  Pour a little at a time, allowing the syrup to sink down into the holes before you add more.  Otherwise it splashes out onto your shirt and floor.  Trust me.  Save just a tiny little bit for you to drink directly out of the blender, because it is soooo delicious.  Trust me, again.  
Cover the cake loosely and pop it in the fridge until all of the syrup absorbs into the cake, about 2 hours.  One website said to let it refrigerate overnight, and that could be a good idea.  It may set up a little more that way.  After your cake has chilled to your desired chilliness, pour the 2 c. heavy whipping cream into a glass bowl (preferably chilled, also) and beat it on high with an electric mixer for 1 1/2 minutes until it begins to thicken.  Stop the machine and add the powdered sugar and vanilla and beat it on high again until stiff peaks form, 1 to 2 minutes longer.  Spread it on top of your cake.  This makes quite a bit of frosting, so you may end up with a little left over.  Or, just pile it all on.  Top the cake with sliced bananas and toasted coconut.  Feel free to put your bananas in the shape of whatever letter you choose.  It doesn't have to be a Y.  It just tastes better that way.        

Thursday, September 15, 2011

Cocoa Layer Cake


Matt made me a birthday cake from heaven this year. It is probably the best chocolate cake I've ever eaten. Have a I said that before? It is rich, and delectable, and moist, and gooey, and if you like chocolate cake, you must try this. He got it from one of our Bon Appetite cookbooks (Feb. 2011).

Thanks babe.


Cocoa Layer Cake

Cake:
½ c. natural unsweetened cocoa powder
1 c. lukewarm water, divided
½ c. buttermilk
1 ½ c. cake flour
¾ tsp. baking soda
1 c. sugar
½ c. (packed) golden brown sugar
½ c. (1 stick) unsalted butter, room temperature
2 large eggs, room temperature, beaten to blend

Frosting:
10 tbsp. (1 ¼ sticks) unsalted butter
1 1/3 c. (packed) golden brown sugar
1 c. natural unsweetened cocoa powder
1 c. heavy whipping cream
2 tsp. vanilla extract

Cake: Position 1 rack in top third and 1 rack in bottom third of oven; preheat to 350° F. Butter three 9-inch-diameter cake pans with 1 ½ inch-high sides. Line with parchment paper rounds; butter parchment. Whisk cocoa and ½ c. warm water in small bowl. Whisk buttermilk and ½ c. water in another small bowl. Sift flour, baking soda, and ¼ tsp. salt into medium bowl. Using electric mixer, beat both sugars and butter in large bowl until pale yellow and fluffy (mixture will appear granular), about 5 minutes. With mixer running, gradually add beaten eggs, then beat until smooth and fluffy, about 15 seconds. Add cocoa mixture; beat to blend. Add flour mixture in 3 additions alternately with buttermilk mixture in 2 additions, beating to blend after each addition. Divide batter among pans (about 1 ¾ c. each).
Bake cakes until tester inserted into center comes out clean, reversing pans halfway through baking, about 18 minutes. Cool completely in pans on racks.

Frosting: Melt butter in med. Saucepan over med. Heat. Stir in sugar, cocoa, and ½ tsp (scant) salt. Gradually stir in cream. Stir until mixture is very hot and just begins to simmer at edges. Reduce heat to low; stir 1 minute to let flavors blend. Transfer to med. Bowl; stir in vanilla (frosting will resemble chocolate sauce). Chill until just thickened, stirring occasionally, about 1 ½ hours. Let stand at room temperature.
Run knife around cake sides. Carefully invert 1 cake onto plate (cake is very tender); peel off parchment. Spread with ½ c. frosting. Invert second cake onto palm of hand. Position cake 2 inches above frosted cake layer. Carefully slide cake onto first cake layer. Peel off parchment. Spread cake with ½ c. frosting. Repeat with third cake layer. Spread remaining frosting over top and sides of cake.


Tuesday, July 26, 2011

Light and Fruity Pineapple Cake

This recipe is a perfect summer-y recipe for a BBQ or other get together.  It is cool, light, sweet and super easy to make.  The topping lightens up the pineapple quite a bit, so if you aren't a big pineapple fan, you may still love this one. Be aware that it is a two day process-you'll need to let the cake sit overnight with the pineapple on it. 


Pineapple Sheet Cake
from my friend Kay


1 yellow cake mix (plus all the ingredients listed on the box needed to make it)
2 cans crushed pineapple (20 oz. each)
1 large package instant vanilla pudding 
1 1/2 c. milk
12 oz. carton of cool whip


In a large bowl, stir together mix the yellow cake mix according to the package directions.  In a large cookie sheet or 10X13 baking dish, bake the cake mix.  I used the 9X13 pan time, plus a few minutes.  Keep an eye on it as it cooks so that you don't over cook it.  When the cake is done, let it cool a little and then poke it with a fork all over.  Spread the 2 cans of pineapple over the top.  Cover it tightly with plastic wrap and put it in the fridge overnight.  The next day, in a large bowl, mix the pudding mix and milk and stir it well.  Don't let it set up.  Stir in the cool whip.   Spread it evenly on top of the pineapple and refrigerate it until you are ready to serve it.

Sunday, February 13, 2011

Valentine's Cake Balls


I made some more cake balls for another friend's birthday. The heart shape was more difficult to dip as a cake pop, so I turned them into cake balls.
For directions on how to make these, go here.


Sunday, February 6, 2011

Rich Chocolate Bundt Cake


I got a bundt cake pan for Christmas (in a round about way) and have just been aching to use it. We had a little talent show for Family Home Evening and I thought making a fancy cake would be a great dessert for my little superstars. In the end, the two big superstars were the ones who ate most of the cake, but hey, I'm not complaining. I looked at a lot of recipes on allrecipes.com, and they were all very similar. It sounds like you can use this model of a cake recipe and switch out the flavors of cake or pudding, or chocolate chips to accommodate what you are wanting. It was a very moist, thick cake, with an excellent flavor. I got the frosting recipe from Nicole and the rich, chocolate frosting, with the sweetness of the cake was so great together.

Too Much Chocolate Cake
1 package devil's food cake mix
1 small package instant chocolate pudding mix (I used sugar free and it was still excellent)
1 c. sour cream
1 c. vegetable oil
4 eggs
1/2 c. warm water
2 c. semi sweet chocolate chips (if you have mini chips, I think they would melt a little better)

Preheat your oven to 350 degrees. In a large bowl mix together the cake mix and pudding mix. Beat the eggs. Add the sour cream, vegetable oil, beaten eggs and water and stir well. Put a tablespoon of flour in a bowl with the chocolate chips and coat them with the flour (this helps so that they don't all sink right to the bottom). Then stir them into the cake mixture. Pour the batter into your well greased bundt cake pan. Bake it for 50-55 minutes, or until the top springs back to the touch. Cool the cake in the pan for at least an hour and a half, then flip it over onto your dish and frost it. I actually halved the recipe for the frosting and it was enough for this type of cake. I know when Nicole made it, she was doing a layered cake and she needed the whole recipe of frosting. I am putting the recipe in the way Nicole gave it to me (whole).

Decadent Chocolate Frosting
1 1/4 stick of butter
1 1/3 c. brown sugar
1/2 tsp. salt
1 c. cocoa
1 c. heavy whipping cream
2 tsp. vanilla

Melt the butter and brown sugar in a saucepan over a medium-low heat. Add the cocoa, salt and whipping cream and stir it all constantly until it is well combined. Remove it from the heat and add the vanilla and stir well. It will be pretty runny. Let it cool for about an hour and then frost your cake with it.

Thursday, January 13, 2011

Strawberry Cake Pops


I was given the new Bakerella cookbook by my good friend from work. It was very sweet of her and since today was her birthday, I decided what better way to pay her back then to make her something yummy to sample from the book.

I decided that these delicious strawberries would be perfect.

These are somewhat time consuming, you definitely need to plan ahead, but they are so worth it! That's an understatement. It's the most amazing bite of cake you will ever eat! Promise.

Strawberry Patch Pops

Ingredients and materials needed:
this is a slightly adapted recipe than the one in the cookbook

1 cake mix, your choice of flavor
1 tub of frosting that pairs well with the cake flavor
1 bag of red candy melts
1 bag of green candy melts (or enough white chocolate with green food coloring to make the green tops)
2 microwave-safe bowls
48 paper lollipop sticks
White sugar pearls
Styrofoam block
Large squeeze bottle or plastic bag
Wax paper
Baking sheet
Green Sour Punch Straws (optional)


Preface: If you want to make less cake pops at a time, like I did, you can actually cut the cake into sections and freeze the leftover sections until ready to use. Just let thaw out before crumbling. Make sure to portion everything else appropriately. I used a quarter of the cake and made 13 cake pops.

Step 1: Choose 1 box of cake mix and 1 tub of frosting to your liking. I chose a Golden Butter cake mix paired with Funfetti frosting. Bake the cake as directed and let cool completely. With a fork, gently crumble entire cake into fine crumbs. Mix tub of frosting in with cake thoroughly until it can be easily molded.

Step 2: With your hands, mold cake balls into the shape of strawberries. Place on wax paper on a baking sheet and cover with plastic wrap. Place in refrigerator until they are firm enough to dip.


Step 3: Melt green candy melts, or melt white chocolate and add green food coloring (do not add food coloring to candy melts! It does not work, I found out the hard way). Pour into a squeeze bottle or plastic bag. If you use a plastic bag, snip a very small portion of the corner to squeeze the chocolate through. Squeeze flower shapes onto wax paper and place in fridge until hardened.


Step 4: When you are ready to dip, melt red candy melts in a tall, skinny bowl. Get white sugar pearls ready to grab. Get a lollipop stick and dip about an inch of it into the candy melts, then stick it into the bottom of a cake ball. Remember to do this next part quickly. It took me one time to get it right, so I had one casualty, but it tasted delicious.

Back to the dipping. Dip the cake ball down into the candy melt and pull it back up quickly or the cake ball might fall off the stick. Very gently tap the wrist of the hand holding the stick to remove excess chocolate white turning the cake ball slowly. This way the chocolate will coat the cake ball evenly. Use your finger to wipe off the chocolate at the base of the cake ball as you spin it around.

Before it dries, stick the sugar pearls in the chocolate as you continue to slowly turn the cake ball to make it look like a strawberry. Stick the cake ball in a Styrofoam block to dry completely. Any excess chocolate can just drip off onto the block.


Step 5: Using a small dab of the red candy melt, stick the green tops onto the cake pops and let dry.


If you can help it, don't eat them all at once. Take time to savor the deliciousness!


If you want to give them away as gifts or store them for later, just wrap them in plastic wrap and tie with ribbon.


Thank you, thank you Brynne for my wonderful gift. It inspired me to make such delicious and exciting treats! I don't know if I can accurately describe how delectable these were!

Friday, December 31, 2010

Lemon Cake


This lemon cake is all lemony, sugary goodness. It is the perfect combo of sweet and tart. My friend made it one day and brought me a couple of pieces and it was amazing! After I ate it, I couldn't stop thinking about it. Within a day or two I called my friend and got the recipe. I bought lemons, just waiting for the perfect time to be able to make it for someone else. I finally had the chance for Christmas dinner and made it for my family, who were not disappointed in its lemony yumminess.
Lemon Cake
1 lemon cake mix
1 small package instant lemon pudding
1 c. oil
4 eggs
2 Tbsp. grated lemon rind (2 medium lemons)
1 1/2 c. water
Glaze
2 c. powdered sugar
juice squeezed from two lemons
3-4 drops yellow food coloring
1 Tbsp. lemon rind
Grease and flour a 9X13 pan. In a large bowl, combine the cake mix, pudding mix, oil, eggs, 2 Tbsp. lemon rind and water and mix well for 3 minutes. Bake it according to the cake mix package directions (I think mine was at 350 degrees for 30 minutes, but just look at the box). When the cake is done, let it cool down, then take a fork and poke that thing like crazy (in a gentle way, you don't want to destroy the top, just make holes in it). Not just a few little pokes, but cover the whole thing in fork pokes. In a separate bowl, mix together the powdered sugar, lemon juice, food coloring and 1 Tbsp. lemon rind until it is smooth. It needs to be pour-able, so if you need a little more juice, squeeze another half of a lemon into it (or more if necessary). Then pour the glaze all over the top of the cake and spread it around to make sure it covers it all and gets into all of those little holes you made. You can either serve it immediately or let it chill for a few hours in the fridge.

Saturday, December 11, 2010

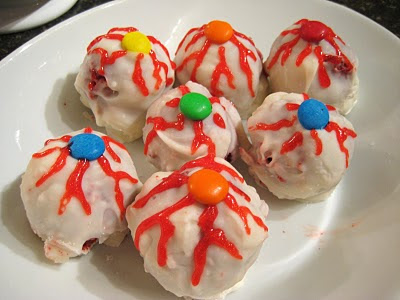
Eyeball Cake Balls


This recipe is a little late, but I thought I would add it for next year. These were a lot of fun for our Halloween party this year. Simpler than I realized. Although, I may need to increase my skill at getting the chocolate to come out smoother while dipping.


Cake Ball Eyeballs:

Ingredients:
1 box of red velvet cake mix
1 container of cream cheese frosting
1 lb. white chocolate or almond bark (for dipping)
tube of red decorating gel
m&ms or other colored candies

Directions:

Cook the cake following the directions on the box. Let the cake cool, then gently crumble with a fork. Crumble until the entire cake is in fine crumbs.

Next, mix the cake with the tub of frosting, stirring until it is thoroughly combined and creates a smooth, doughy consistency. Mold the soft cake mixture into small balls with your hands and place on parchment paper. It helps to freeze for about an hour before dipping.

Melt the chocolate or almond bark in a double boiler or in a saucepan over very low heat, stirring constantly. Once it's completely melted, remove from heat and begin dipping cake balls in chocolate.

*Remember that the whole process of dipping should go very quickly before the ball starts to melt and you get a crumbly mess.

If you use a fork, gently dip and roll the ball in the chocolate, lift out and place on parchment paper to dry. Gently push an m&m in the center of the ball before the chocolate dries completely. You can also use lollipop sticks to roll in the chocolate and stick in Styrofoam balls to dry to make cake ball suckers.

Once the chocolate is dry, decorate with red icing to make veins.

Enjoy the spookiness.

Saturday, October 30, 2010

Pumpkin Torte


I love the fall! I love the colors, the smells, the chilly nights by a warm fire, and especially the fall foods. Pumpkin is so versatile. Tell it what to do and where to go and it always turn out yummy. If you want a delicious fall dessert, try this one- our friend made it for us last week and it was so good I knew it was the dessert I wanted to do for the craft group I hosted this month. I fed it to 15 ladies and they loved it too, so that's pretty good odds. How can you not though? It's pumpkin immersed in sugary heaven.


Ingredients:
  • 1 package (18-1/4 ounces) yellow cake mix
  • 1 can (15 ounces) solid-pack pumpkin, divided
  • 1/2 cup milk
  • 4 eggs
  • 1/3 cup canola oil
  • 1-1/2 teaspoons pumpkin pie spice, divided
  • 1 package (8 ounces) cream cheese, softened
  • 1 cup confectioners' sugar
  • 1 carton (16 ounces) frozen whipped topping, thawed
  • 1/4 cup caramel ice cream topping (I omitted these and the nuts and sprinkled nutmeg on top)
  • 1/3 cup chopped pecans, toasted

Directions

In a large bowl, combine the cake mix, 1 cup pumpkin, milk, eggs, oil and 1 teaspoon pumpkin pie spice; beat on low speed for 30 seconds. Beat on medium for 2 minutes. Pour into two greased and floured 9-in. round baking pans.

Bake at 350° for 25-30 minutes or until a toothpick inserted near the center comes out clean. Cool for 10 minutes before removing from pans to wire racks to cool completely.

In a large bowl, beat the cream cheese until light and fluffy. Add the confectioners' sugar, and remaining pumpkin and pumpkin pie spice; beat until smooth. Fold in whipped topping.

Cut each cake horizontally into two layers. Place bottom layer on a serving plate; spread with a fourth of the filling. Repeat layers three times. Drizzle with caramel topping; sprinkle with pecans. Store in the refrigerator.


Don't judge me by my lack of layering skills. It tastes good, that's all that matters.

Sunday, June 20, 2010

Tres Leches


We went on a picnic and bike ride with some good friends and so I made a dessert for us to have when we got back. I found this recipe on Pioneer Woman. Her photos are much prettier than mine, but, oh, it's delicious!!


Tres Leches
Ingredients:
  • 1 cup All-purpose Flour
  • 1-½ teaspoon Baking Powder
  • ¼ teaspoons Salt
  • 5 whole Eggs
  • 1 cup Sugar, Divided
  • 1 teaspoon Vanilla
  • ⅓ cups Milk
  • 1 can Evaporated Milk
  • 1 can Sweetened, Condensed Milk
  • ¼ cups Heavy Cream

  • FOR THE ICING:
  • 1 pint Heavy Cream, For Whipping
  • 3 Tablespoons Sugar

Preparation Instructions

Preheat oven to 350 degrees. Spray a 9 x 13 inch pan liberally until coated.

Combine flour, baking powder, and salt in a large bowl. Separate eggs.

Beat egg yolks with 3/4 cup sugar on high speed until yolks are pale yellow. Stir in milk and vanilla. Pour egg yolk mixture over the flour mixture and stir very gently until combined.

Beat egg whites on high speed until soft peaks form. With the mixer on, pour in remaining 1/4 cup sugar and beat until egg whites are stiff but not dry.

Fold egg white mixture into the batter very gently until just combined. Pour into prepared pan and spread to even out the surface.

Bake for 35 to 45 minutes or until a toothpick comes out clean. Turn cake out onto a rimmed platter and allow to cool.

Combine condensed milk, evaporated milk, and heavy cream in a small pitcher. When cake is cool, pierce the surface with a fork several times. Slowly drizzle all but about 1 cup of the milk mixture—try to get as much around the edges of the cake as you can.

Allow the cake to absorb the milk mixture for 30 minutes. To ice the cake, whip 1 pint heavy cream with 3 tablespoons of sugar until thick and spreadable.

Spread over the surface of the cake. Decorate cake with strawberries. Cut into squares and serve.


I don't know why, but my egg whites would not form soft peaks. It seemed to have the opposite effect the longer I beat them. It still cooked with no problems though.
It was the perfect treat to come home to and share with our friends who had never had Tres Leches before. It's one of Matt's favorite cakes because he ate it all the time on his mission, being on the border with Mexico. I am a big fan of very moist cakes, so smothering cake in sugar milk will always sound like a great idea.