Sunday, November 25, 2018

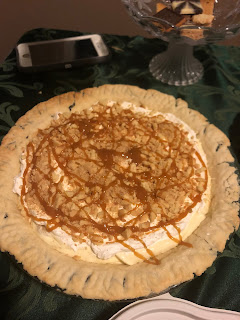
Amazing Banana Cream Pie with Salted Caramel Sauce

We made a lot of really delicious pies for Thanksgiving this year.  This was one that my girls and I found and decided that we really needed this on Thanksgiving.  It was super easy, very creamy and delicious, and probably my favorite of all that I tasted.

Banana Cream Pie with Salted Caramel Sauce
adapted from: thisgalcooks.com

1 baked pie crust
1 c. chopped vanilla wafers
2 small bananas
1 8 oz. tub of whipped topping, divided
1 1/2 c. milk
1 5.1 oz box of instant banana cream pudding
dash of lemon juice
salted caramel sauce

In a large bowl, stir together the banana pudding and the milk until thick and creamy.  Fold in 1/2 of the tub of whipped topping.  Slice your bananas and sprinkle them with a dash of lemon juice to prevent them from browning.  Stir the banana slices in to your pudding mixture.  Pour it all in your cooled pie crust.  Refrigerate the pie until the pudding is set (I made mine before the Thanksgiving meal started, and then added the rest of the ingredients just before we ate pie).  Spread the remaining whipped topping over the top of the pudding mixture.  Sprinkle the chopped vanilla wafers on top, and then drizzle the salted caramel sauce over the top of the wafers.  Serve it immediately and enjoy!

Sunday, September 9, 2018

Copycat Zupa's Mango Berry Salad

The Mango Berry Salad from Zupa's Cafe is my very favorite salad.  I get it every time I go there.  I think I could happily eat this every day!  (And, I did, for about a week, so that none of the delicious dressing or berries would go to waste!)

Mango Berry Salad with Mango Dressing and Cinnamon Almonds
adapted from: sixsistersstuff.com

8-10 c. salad greens
2 c. sliced strawberries
1 small package blueberries
1 mango, cubed

For the dressing:
1 (5.3 oz) container vanilla greek yogurt
1 Tbsp. lemon juice
1 mango, pitted, peeled and cubed
1 tsp. honey
pinch of salt

In a food processor or blender, combine all the ingredients until it is smooth.  Then taste it and add more honey or salt to taste.

For the cinnamon almonds:
I put a handful of sliced almonds (about 1/2 c.) in a small frying pan, with about two teaspoons of butter, and a generous sprinkling of cinnamon sugar.  Over medium-low heat, stir it constantly until the butter and sugar melt and coat the almonds.  Remove it from the heat.  Once they have cooled, sprinkle them over the top of your salad.

In a large bowl, combine the greens, strawberries, blueberries, mango cubes and cinnamon almonds.  Pour some of the dressing over the top and toss it to coat.  Serve and enjoy!

Sunday, July 29, 2018

Shredded Chicken in the Instant Pot (From Frozen or Fresh Chicken Breasts)

I love my Instant Pot.  There are so many reasons that I love it, but this is one of my top reasons: shredded chicken.  It is so incredibly fast and easy to throw in some chicken breasts from the freezer, shred them when they are done, and bag them in 1 cup increments to be used later in all sorts of yummy recipes.  It really makes my meal time prep so much faster on a busy weeknight!

Shredded Chicken in the Instant Pot
by: Carolyn (after reading many, many blogs on this subject)

5 chicken breasts (really, do as many as you want, but I usually don't fill the Instant Pot up more than about halfway full)
1 c. chicken broth
generous sprinklings of onion powder, garlic powder, kosher salt and fresh ground pepper

Place the chicken in the Instant Pot.  Pour the chicken broth over the top.  Sprinkle all of the seasonings on top of the chicken.  Set your Instant Pot for High Pressure, for 14 minutes if the chicken is fresh, 26 minutes if the chicken is frozen.  When the chicken is done cooking, I let it do a natural release until I am ready to shred it.  Then I put it all in my Kitchen Aid mixer and turn it on to the lowest speed until it is shredded.  Put the shredded chicken in freezer bags in 1 cup increments, label them with a sharpie and freeze them for later.  I use it in my soups, enchiladas, tacos, taquitos and whatever else I am making that calls for chicken!  It is such a time saver!

Wednesday, June 27, 2018

Liege Waffles (Authentic Belgium Waffles-Like in the Train Stations)

When I was in my early 20's, I backpacked around Europe for a few weeks with my roommate.  We ate so much delicious food!  Of all the amazing things we tasted, my favorite was the waffles in Belgium, eaten fresh from the cart in the train station.  Sooo delicious!  It is more like a cookie than a waffle.  A thick, sweet, sugar crystal filled, waffle shaped cookie.  For years (before the internet was as amazing as it is now) I tried to figure out what the secret sugar ingredient was in the waffle.  Now, all you have to do is a google search, and you'll know it is Belgium Pearl Sugar.  You can buy it on Amazon for about $10 a bag, and it's worth it to have the authentic stuff, straight out of Belgium.  My sister gave me a bag for my birthday, and we loved trying out different recipes to see what we thought was the most like the waffles from the train stations in Belgium.  A downside to these waffles: they are pretty high maintenance.  You need to plan a day in advance of when you want them.  They are like bread, they have to have time to rise.  And, they are a lot of work!  But they are definitely worth it!  I am going to put on two recipes: an easier recipe, which although still delicious, was not quite authentic, and the more time consuming recipe, which was my favorite of the two.

Liege Waffles
from the back of my Waffle Pantry pearl sugar bag

1 c. milk
2 1/2 tsp. instant dry yeast
4 c. flour
2 eggs
6 Tbsp. brown sugar
2 tsp. vanilla
1/2 Tbsp. cinnamon
1 generous pinch of salt
10 oz. butter
1 c. Waffle Pantry Belgium pearl sugar

Heat the milk to lukewarm.  In a large bowl, pour the milk in and stir the yeast into it and let it sit for 5 minutes.  Add the flour, eggs, brown sugar, vanilla, cinnamon and salt.  Mix it to form a sticky dough.  Add the softened butter and mix it until it is just combined.  Cover the dough and let it rest for 2-3 hours.  After it is good and rested, gently fold in the pearl sugar.  Divide it into 10 portions and rest for 15 minutes.  Bake it in the waffle iron until it is golden.  I baked some at this point, and saved some for the kids for the next morning.  Those that I baked the next morning tasted a little better to us.

Recipe #2 (the harder, but more authentic version)
from: ashleemarie.com

1 Tbsp. yeast
1 tsp. sugar
3/4 c. whole milk, warmed
2 eggs, room temperature, lightly beaten
4 c. bread flour (For 1 c. worth, I just used 2 Tbsp cornstarch, mixed with enough flour to make 1 c.)
3 Tbsp. brown sugar
1 1/2 tsp. salt
1 c. butter, softened
2 Tbsp. honey
1 Tbsp. vanilla
1 1/2 c. Belgium pearl sugar

Pour the milk, yeast and sugar into your mixing bowl, and let it sit for 5 minutes.  Add the eggs and 1 1/2 cups of the flour and mix it until it is smooth.  Sprinkle the remaining flour over the mixture to keep it from getting a crusty top, and let it rise for 90 minutes.  When it is done rising, add the brown sugar and salt and blend on medium speed.  While it is mixing, add the honey and vanilla.  Add the butter, 2 Tbsp. at a time.  Mix the dough for 4 minutes, at medium low speed.  Let the dough rest for 1 minute, then mix it again for 2 minutes, then rest and repeat the process until the dough balls up on the hook.  Cover it and let it rise for 4 hours.  When it is done rising, punch the dough down, wrap it in plastic wrap, place it in a bowl and weigh it down with something (like a bowl) and refrigerate it overnight.  In the morning, place the dough (it will be firm) on a lightly floured surface and knead in the pearl sugar, a little bit at a time.  Divide the dough into 13 balls, and let it rise for another 90 minutes.  Cook it in a waffle iron for 3-4 minutes.  If the waffle iron gets too hot, the sugar will burn, so pay attention to the temperature of your waffle iron (the recipe says to keep it at 360 degrees.  I can't tell the temperature on mine, but I didn't have any problems cooking them).  Be careful when you eat these, the sugar is very hot!  You will want to let them cool for a minute.  And enjoy, after all that hard work!

Monday, April 30, 2018

Harry Potter Butter Beer Recipe

This little wizard wanted a Harry Potter birthday party this year.  We had gone to Universal Studios Harry Potter World in September, and the delicious butter beer was on our brains, so we found a copy cat recipe and made it for his birthday party.  There are many recipes out there, but this one was the easiest, and for a bunch of 9 year olds that didn't know any better, this was perfect!  This recipe calls for cream soda as the drink, and the real 
delicious-ness is in the frothy, creamy, buttery topping.  To make it a little more authentic, you can add butter extract and caramel extract to the cream soda.  But it is still really yummy if you don't!

Harry Potter's Butter Beer
by: favfamilyrecipes.com

For the drink:
2 liter bottle of cream soda, chilled
1/4 tsp. caramel extract
1/4 tsp. butter extract

For the cream topping:
1 c. heavy whipping cream
1/2 c. butterscotch topping
1/4 c. powdered sugar

In a large mixing bowl, whip the whipping cream on high speed until it forms stiff peaks.  Add the butterscotch topping and powdered sugar and stir it together.  If you are going to add the butter and caramel extract to the cream soda, now is the time.  Then pour the cream soda into a glass and add a generous spoonful of the butterscotch whipped cream topping to it.   

Tuesday, April 3, 2018

Pumpkin Toffee Muffins with Streusel Topping

I made this pumpkin muffin recipe the other day, and they were so moist and delicious!  In fact, my kids are watching me post this and asking me to make them again.  The original recipe called for the streusel to be put inside the muffins, but I found a different streusel recipe, and put it on as a topping instead, and we were very happy with it this way.

Pumpkin Muffins
from: cookiedoughandovenmitt.com

1/2 c. sugar
3/4 c. brown sugar
2 tsp. pumpkin pie spice (I have a recipe here)
1 tsp. cinnamon
15 oz. pumpkin puree
1/2 c. vegetable oil
3 eggs
1 tsp. vanilla
1/4 c. milk
2 1/2 c. cake flour
3 tsp. baking powder
1 tsp. baking soda
1 tsp. salt
1 1/2 c. toffee bits

Streusel
from: allrecipes.com

3/4 c. sugar
3/4 c. flour
1 Tbsp. water
1 1/2 tsp. cinnamon
1/4 c. butter, softened

Preheat the oven to 375 degrees.  Line your muffin tin with liners, or spray it with cooking spray.  In a large bowl, stir together the sugars, cinnamon and pumpkin pie spice.  Add in the pumpkin and oil and stir it well.  Stir in the eggs, vanilla and milk.  In a separate bowl, stir together the flour, baking powder, baking soda and salt and then add it to the wet ingredients and mix it until it is combined.  Stir in the toffee bits and pour the batter into the muffin tin until each muffin is two thirds full.  
In a small bowl, add all of the streusel ingredients, and then mix it until it is well combined and it is in pea sized chunks.  I did this with my fingers and it worked well.
Add the streusel to the top of each muffin and press it down lightly with your fingers.  Bake it for 15 minutes at 375, and then reduce the heat to 350 for 10 more minutes.  When a toothpick inserted in the center comes out clean, they are done.  Mine cooked perfectly this way.  

Sunday, March 11, 2018

2 Minute Balsamic Glazed Brussel Sprouts (in the Instant Pot)

I love brussel sprouts.  I didn't realize this until the last few years, but I do.  The other day I tried them in my Instant Pot, and once again, I wasn't disappointed.  These cooked for 2 whole minutes!  It does take a little time to pressurize the Instant Pot, but it was still a fast, easy way to make delicious brussel sprouts!

Balsamic Glazed Brussel Sprouts
adapted from: arealfoodjourney.com

4 c. brussel sprouts-slice the end off, and cut each in half
3 slices bacon, chopped (You'll notice in the picture, I used sausage, and it still gave a yummy flavor, but wasn't very appetizing to eat after it had cooked.  Just use bacon.)
1/2 c. water
1 Tbsp. honey
coarse salt
2 splashes of balsamic vinegar, or more, to taste

Set your Instant Pot to saute and when it is hot, cook your bacon until it is brown.  Add the brussel sprouts and saute them with the bacon, stirring continually.  Add the water to the pot.  Turn off the saute function and close and lock the lid in place, with the lid set to seal.  Using the manual setting, cook at high pressure for 2 minutes.  When it is done, do a quick release.  Meanwhile, in a small bowl, mix together the water, honey, salt and balsamic vinegar.  Drizzle it over the brussel sprouts and stir it to mix.     


Sunday, March 4, 2018

Orange Glazed Candied Yams (Cooked in the Instant Pot)


You know I love it, right?  I can't get enough of my Instant Pot Pressure Cooker.  I don't think I have even used my slow cooker since I figured this gem out.  I recently needed to make candied yams, and I whipped these babies out in a fraction of the time by using my Instant Pot.  I did an orange juice glaze, for a little bit of a change, and they got rave reviews!

Orange Glazed Candied Yams
adapted from: allrecipes.com

7-8 yams (depending on how big they are--you can do as many as you would like and will fit)
1/4 tsp. salt
1/2 c. brown sugar
1/2 tsp. cinnamon
1/4 tsp. nutmeg
1 c. orange juice
2 Tbsp. butter
mini marshmallows

Wash but don't peel the yams and place them in the Instant Pot (I put mine on the steamer that came with the Instant Pot).  Pour in one cup of water.  Secure the lid and turn the valve to seal.  Use the manual mode and set to pressure cook on high for 15 minutes.  Do a natural release for 10 minutes.  Manually release any pressure that is remaining.  Take the yams out of the Instant Pot, and when they are cooled enough to touch, the skin should easily peel off.  Cut the yams into 1 inch squares and place them in a 9X13 pan.  In a saucepan, mix together the salt, brown sugar, cinnamon, nutmeg, orange juice and butter, until the butter and sugar are dissolved.  Pour it over the sliced yams.  Spread the mini marshmallows over the top of the yams and toast them in your oven, on broil.  Watch them close!  Unless you love burned marshmallows.


Sunday, January 14, 2018

A Winning Chipotle Chicken Chili Recipe

Every Fall, the company my husband works for has a Chili Cookoff.  Last year he lost by one vote (His own, because he felt guilty voting for his own chili, and voted for someone else, who won by one vote.  Ha ha!  He didn't make that mistake this year!).  This year, he wanted to do something different and amazing and delicious.  This recipe idea came from my sister, and we cooked it up the night before, and knew it would be a hit!  And he won the contest!
 That is a serious trophy to be displayed in his office for the next year.

Chipotle Chicken Chili
adapted from: Pionner Woman
2 Tbsp. oil
1 whole onion, diced (I used dehydrated)
2 tsp. minced garlic
2 chicken breasts, cut into a large dice
1 can of Rotel tomatoes
3 whole Chipotle Peppers in Adobe Sauce, minced (you buy this in a can)
1 can pinto beans, drained and rinsed
1 can black beans, drained and rinsed
1 can kidney beans, drained and rinsed
1 Tbsp. chili powder
1 Tbsp. ground cumin
1 tsp. salt (more to taste)
1 lime, juiced (more to taste)
sour cream, for serving
shredded cheese, for serving
cilantro, for serving

Heat the oil in a large pot, over medium heat.  Add the onions and garlic and cook for a few minutes until the onions are tender.  Add the chicken and cook until it is cooked through and lightly browned.  Stir in the tomatoes, chipotles, beans, chili powder, cumin and salt.  Cover it and cook it for 1 hour.  At this point, the Pioneer Woman calls for using masa harina as a thickening agent.  We didn't use anything, and ours ended up with a perfect thickness.  If you want it thicker, feel free to thicken it up right now.  Stir in the lime juice and taste it to see if you need more salt, lime or even chipotles, if you want a little more of a kick.
Serve it with sour cream, cheese and cilantro.