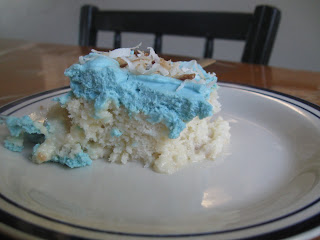
One day, as I was looking for something yummy to make, I stumbled upon a recipe for coconut tres leches cake. The pictures looked so delicious that I couldn't stop thinking about it. I've been waiting for a reason to make it and finally, yesterday I decided to make it to take to a potluck Utah/BYU football game party. There were not many supporters of our Alma Matter (we were 3 out of 18), but this cake was so good that even those die hard Ute fans were willing to stain their mouths with the blue frosted tres leches cake. They even appreciated the Y made out of bananas on top (which I forgot to take a picture of). The fact that BYU lost miserably probably helped in their desire to eat it. Good thing, or they would have missed out. It was amazing.
Coconut Tres Leches Cake
adapted from: www.melskitchencafe.com
Cake
1 white cake mix made according to package directions
Milk Syrup
1 can (15 oz.) cream of coconut*
1 can (12 oz.) evaporated milk
1 c. heavy whipping cream
1 tsp. vanilla
*cream of coconut is NOT coconut milk. You find it in the mixer section of your local grocery store. It is in a small, skinny can.
Sweetened Cream Topping
2 c. heavy whipping cream
1/2 c. powdered sugar
1 tsp. vanilla
1 banana, sliced
1/4 c. shredded coconut, toasted (you can do this in a frying pan, on med-low heat, stirring constantly. It takes just a couple of minutes)
Make the cake according to the package directions and let it cool about 1 hour. After the cake has cooled, in a blender combine the cream of coconut, evaporated milk, whipping cream and vanilla and blend it until it is smooth. Once the cake has cooled, poke it all over with a fork. Now here is a little tip on this: while you do need to poke it all over, don't poke all the way to the bottom of the pan. Based on the pictures on the other websites I looked at, it looks like they left a very little un-poked cake on the bottom. This allowed theirs to retain some shape. While mine tasted muchos delish, it was definitely your typical tres leches, falling apart all over the place. I wouldn't leave a lot of space on the bottom (like maybe less than 1/8 inch) (ha ha! Like you can really tell how close you are to the bottom of the cake!). Forget it, just do your best! It will taste heavenly, even if it does begin to resemble cake soup.
Back to our milk syrup: once the cake has cooled, and been stabbed all over, pour your milk syrup smoothie all over it. Pour a little at a time, allowing the syrup to sink down into the holes before you add more. Otherwise it splashes out onto your shirt and floor. Trust me. Save just a tiny little bit for you to drink directly out of the blender, because it is soooo delicious. Trust me, again.
Cover the cake loosely and pop it in the fridge until all of the syrup absorbs into the cake, about 2 hours. One website said to let it refrigerate overnight, and that could be a good idea. It may set up a little more that way. After your cake has chilled to your desired chilliness, pour the 2 c. heavy whipping cream into a glass bowl (preferably chilled, also) and beat it on high with an electric mixer for 1 1/2 minutes until it begins to thicken. Stop the machine and add the powdered sugar and vanilla and beat it on high again until stiff peaks form, 1 to 2 minutes longer. Spread it on top of your cake. This makes quite a bit of frosting, so you may end up with a little left over. Or, just pile it all on. Top the cake with sliced bananas and toasted coconut. Feel free to put your bananas in the shape of whatever letter you choose. It doesn't have to be a Y. It just tastes better that way.
Sheet Pan Sausage and Veggies with Maple Dijon Sauce
-
The Best Sheet Pan Sausage and Veggies for Busy Nights Let me just say it:
sheet pan dinners are lifesavers. When the day gets away from me (which
happens ...
8 hours ago


No comments:
Post a Comment