Sunday, September 25, 2011

Easy Slow Cooker Chicken Tacos


These are easy.  These are so easy that I made a new label: ridiculously easy.  Because they are done in the slow cooker, they aren't fast, so don't confuse the two.  You do need a good 4-6 hours to cook these, but the prep time is only as long as it takes you to defrost some chicken.  Unless you start your chicken frozen in the crock pot.  Do any of you do that?  Would I die from salmonella if I did that?  Because I'm not going to lie to you, I'm pretty darn lazy and if I didn't have to defrost my chicken first, these would be labeled "hysterically, ridiculously easy".  So throw some chicken, broth and taco seasoning in your crockpot, cook it, shred it, serve it with your favorite taco fixins' and feel so happy that you made a meal that was so ridiculously easy!


Shredded Chicken Tacos
from: BFF Jacque


1 c. chicken broth
1 pound chicken breasts
1 package taco seasoning


Pour the chicken broth into your slow cooker.  Dissolve the taco seasoning in the broth.  Put the chicken in and cook it on high for 4 hours or low for 6-8 hours.  After it has cooked, shred the chicken with a fork.  Serve it however you like your tacos!

Banana Almond Muffins


So my good friend from work also loves to bake and she has given me a few awesome recipes that I will be keeping and making for a long time.  One recipe that she loves to make, and luckily loves to share with us the next day:), is this yummy muffin recipe.  They are sweet and filling and perfect for breakfast or brunch!  The original recipe calls for macadamia nuts, but my friend makes them with almonds and I didn't want to mess with something so perfect.  (She actually uses whole almonds but I had slivered on hand, so depending on the amount of crunch you want, you could always coarsely chop some whole almonds for the top instead.)  And if I'm completely honest, I accidentally added a little too much pineapple and I was scared it would be too thin, but they turned out perfect and I liked the added sweetness.


Banana Almond Muffins
adapted from Stasha Wampler

Yields: 2 dozen

Ingredients:

3 c. flour
2 c. sugar
2 tsp. ground cinnamon
1 tsp. baking soda
1 tsp. salt
3 eggs
1 c. canola oil
1 tsp. vanilla extract
3 medium ripe bananas, mashed
1 c. flaked coconut
1 can (8 oz.) crushed pinapple, drained
1 c. almonds, whole (coarsely chopped) or slivered


Directions: 

In a large bowl, combine the flour, sugar, cinnamon, baking soda, and salt.  in another bowl, combine the eggs, oil, and vanilla.  Stir into dry ingredients just until moistened.  Fold in the bananas, coconut, and pineapple.

Fill greased or paper-lined muffin cups two-thirds full.  Sprinkle with nuts. (Be generous.)  Bake at 375 degrees for 18-20 minutes or until a toothpick comes out clean.  Cool for 5 minutes before removing from pans to wire racks.


Don't wait to make these!  You won't regret it.

Crispy Eggplant Parmesan


Before this recipe I had never tried Eggplant Parmesan (in all honesty, I had never eaten eggplant at all) and so when a friend gave me one of her eggplants, fresh from her garden, I decided to see why people actually like it so much.  (I mean it’s a weird, squeaky veggie in place of meat.)  Everyone told me how much they love Eggplant Parmesan, and so as I was searching for a great recipe online, I found this one that the people raved about in the reviews, and now I see why.  It was really delicious, and to tell you the truth, I absolutely loved the eggplant in it!  I even preferred it over chicken (although my husband will always prefer everything with meat:)

One note I will add about this recipe is that in the end, there wasn’t enough sauce to use for our pasta as well.  I added some of our favorite tomato-basil pasta sauce from a jar to eat over our pasta. (We like a lot of sauce in our family.)  So if you’re planning on eating it with pasta, I would either double the sauce or have an extra jar on hand if you need more.


Crispy Eggplant Parmesan
Adapted from Food Network.com

Ingredients:

1 tbsp. canola oil
1/2 medium onion, chopped
1/2 tbsp. chopped garlic
Dash red pepper flakes (to taste- I like it less spicy)
1 tsp. Italian seasoning
½ can crushed tomatoes (or 2-3 fresh tomatoes)
Kosher salt and freshly ground black pepper
1/4 cup flour
1 egg
1/4 cup water
1/2 cup dried Italian bread crumbs or Panko mixed with Italian seasonings
1/4 cup cornmeal
2 tbsp. grated Parmesan, divided
1 eggplant
1/2 cup shredded mozzarella cheese
2-3 tbsp. chopped fresh basil

Directions:

In a large pot over medium-high heat, add the canola oil. Add the onion and cook until softened, about 5 minutes. Add the garlic and red pepper flakes and cook for 1 minute. Add the 2 teaspoons Italian seasoning, tomatoes and season with salt and pepper, to taste Bring to a simmer and let cook for 10 minutes. . (I used fresh tomatoes and allowed to simmer for 30 minutes.  I also added fresh basil.)

Preheat oven to 375 degrees F.

Set up a breading station using 3 baking dishes. In the first dish, add the flour and season with salt and pepper, to taste. In the second dish whisk the eggs with 1/4 cup water. In the third dish combine the bread crumbs, cornmeal, 1 tablespoon Parmesan and season with salt and pepper, to taste. Slice the eggplant into 3/4-inch slices. Dredge them in flour, then in the egg wash and then in the bread crumbs.

Set a cooling rack on top of a cookie sheet and arrange the eggplant slices on the cooling rack.  Bake in oven until crispy, about 30-35 minutes

Turn the oven to broil. Put the eggplant, overlapping, into a baking dish. Cover eggplants with about a cup of sauce and sprinkle with the mozzarella cheese and remaining tablespoon of Parmesan. Put under the broiler until the cheese is melted and bubbling, about 3 to 4 minutes. For last minute under broiler, sprinkle fresh basil on top to garnish.

Serve over linguine pasta with remaining sauce.  Enjoy!


Saturday, September 24, 2011

Honey Lime Chicken Enchiladas


This is my go-to dish when I need something easy and delicious!  I love these enchiladas, my husband loves them, and usually anyone that tries them wants the recipe.  As I’ve mentioned before, I don’t love to make the same thing all the time, but this dish is one exception.  These are a regular at our house!


The Sisters’ CafĂ© is one of my favorite blogs to get awesome recipes (like the Brie en Croute!!).  When I make these, I like to add black beans inside the enchiladas.  This adds a nice texture and flavor, but it also helps the chicken go a lot further!


Honey Lime Chicken Enchiladas
Adapted from The Sisters’ Cafe


Ingredients:
1.5 lbs pork or chicken, cooked and shredded

Sauce:
1/3 c honey
1/4 c lime juice
1 Tb chili powder
1/2 tsp garlic powder

2 (10 oz) cans green enchilada sauce
1-2 cans black beans
Equal parts mixed together of:
mozzarella cheese, shredded
cheddar cheese, shredded

flour tortillas
sour cream & salsa

Directions:
Mix together sauce ingredients then add to shredded pork or chicken. Let the sauce soak into the meat for about 30 minutes.
Lightly spray 2 pans with non-stick baking spray.  (I usually fill a 9x13 and a 9x9. It may vary depending on how much chicken you put in each one.) Pour green enchilada sauce into pans to coat the entire bottom. Fill tortillas with shredded meat, black beans, and desired amount of cheese. Roll and place in dish.
Pour remainder of sauce over enchiladas and sprinkle a generous amount of cheese on the top! Bake uncovered at 350 degrees for 30 minutes. Then turn on broiler and place enchiladas nearer the top of oven. Let it broil until cheese is slightly brown and crispy.
To serve, top with sour cream and salsa.  Delicious!


Sunday, September 18, 2011

Coconut Tres Leches Cake

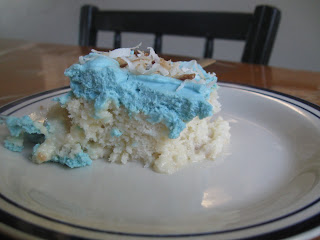
One day, as I was looking for something yummy to make, I stumbled upon a recipe for coconut tres leches cake.  The pictures looked so delicious that I couldn't stop thinking about it.  I've been waiting for a reason to make it and finally, yesterday I decided to make it to take to a potluck Utah/BYU football game party.  There were not many supporters of our Alma Matter (we were 3 out of 18), but this cake was so good that even those die hard Ute fans were willing to stain their mouths with the blue frosted tres leches cake.  They even appreciated the Y made out of bananas on top (which I forgot to take a picture of).  The fact that BYU lost miserably probably helped in their desire to eat it.  Good thing, or they would have missed out.  It was amazing.


Coconut Tres Leches Cake
adapted from: www.melskitchencafe.com


Cake
1 white cake mix made according to package directions


Milk Syrup
1 can (15 oz.) cream of coconut*
1 can (12 oz.) evaporated milk
1 c. heavy whipping cream
1 tsp. vanilla


*cream of coconut is NOT coconut milk.  You find it in the mixer section of your local grocery store.  It is in a small, skinny can.


Sweetened Cream Topping
2 c. heavy whipping cream
1/2 c. powdered sugar
1 tsp. vanilla
1 banana, sliced
1/4 c. shredded coconut, toasted (you can do this in a frying pan, on med-low heat, stirring constantly.  It takes just a couple of minutes) 


Make the cake according to the package directions and let it cool about 1 hour.  After the cake has cooled, in a blender combine the cream of coconut, evaporated milk, whipping cream and vanilla and blend it until it is smooth.  Once the cake has cooled, poke it all over with a fork.  Now here is a little tip on this: while you do need to poke it all over, don't poke all the way to the bottom of the pan.  Based on the pictures on the other websites I looked at, it looks like they left a very little un-poked cake on the bottom.  This allowed theirs to retain some shape.  While mine tasted muchos delish, it was definitely your typical tres leches, falling apart all over the place.  I wouldn't leave a lot of space on the bottom (like maybe less than 1/8 inch) (ha ha!  Like you can really tell how close you are to the bottom of the cake!).  Forget it, just do your best!  It will taste heavenly, even if it does begin to resemble cake soup.   
Back to our milk syrup:  once the cake has cooled, and been stabbed all over, pour your milk syrup smoothie all over it.  Pour a little at a time, allowing the syrup to sink down into the holes before you add more.  Otherwise it splashes out onto your shirt and floor.  Trust me.  Save just a tiny little bit for you to drink directly out of the blender, because it is soooo delicious.  Trust me, again.  
Cover the cake loosely and pop it in the fridge until all of the syrup absorbs into the cake, about 2 hours.  One website said to let it refrigerate overnight, and that could be a good idea.  It may set up a little more that way.  After your cake has chilled to your desired chilliness, pour the 2 c. heavy whipping cream into a glass bowl (preferably chilled, also) and beat it on high with an electric mixer for 1 1/2 minutes until it begins to thicken.  Stop the machine and add the powdered sugar and vanilla and beat it on high again until stiff peaks form, 1 to 2 minutes longer.  Spread it on top of your cake.  This makes quite a bit of frosting, so you may end up with a little left over.  Or, just pile it all on.  Top the cake with sliced bananas and toasted coconut.  Feel free to put your bananas in the shape of whatever letter you choose.  It doesn't have to be a Y.  It just tastes better that way.        

Thursday, September 15, 2011

Cocoa Layer Cake


Matt made me a birthday cake from heaven this year. It is probably the best chocolate cake I've ever eaten. Have a I said that before? It is rich, and delectable, and moist, and gooey, and if you like chocolate cake, you must try this. He got it from one of our Bon Appetite cookbooks (Feb. 2011).

Thanks babe.


Cocoa Layer Cake

Cake:
½ c. natural unsweetened cocoa powder
1 c. lukewarm water, divided
½ c. buttermilk
1 ½ c. cake flour
¾ tsp. baking soda
1 c. sugar
½ c. (packed) golden brown sugar
½ c. (1 stick) unsalted butter, room temperature
2 large eggs, room temperature, beaten to blend

Frosting:
10 tbsp. (1 ¼ sticks) unsalted butter
1 1/3 c. (packed) golden brown sugar
1 c. natural unsweetened cocoa powder
1 c. heavy whipping cream
2 tsp. vanilla extract

Cake: Position 1 rack in top third and 1 rack in bottom third of oven; preheat to 350° F. Butter three 9-inch-diameter cake pans with 1 ½ inch-high sides. Line with parchment paper rounds; butter parchment. Whisk cocoa and ½ c. warm water in small bowl. Whisk buttermilk and ½ c. water in another small bowl. Sift flour, baking soda, and ¼ tsp. salt into medium bowl. Using electric mixer, beat both sugars and butter in large bowl until pale yellow and fluffy (mixture will appear granular), about 5 minutes. With mixer running, gradually add beaten eggs, then beat until smooth and fluffy, about 15 seconds. Add cocoa mixture; beat to blend. Add flour mixture in 3 additions alternately with buttermilk mixture in 2 additions, beating to blend after each addition. Divide batter among pans (about 1 ¾ c. each).
Bake cakes until tester inserted into center comes out clean, reversing pans halfway through baking, about 18 minutes. Cool completely in pans on racks.

Frosting: Melt butter in med. Saucepan over med. Heat. Stir in sugar, cocoa, and ½ tsp (scant) salt. Gradually stir in cream. Stir until mixture is very hot and just begins to simmer at edges. Reduce heat to low; stir 1 minute to let flavors blend. Transfer to med. Bowl; stir in vanilla (frosting will resemble chocolate sauce). Chill until just thickened, stirring occasionally, about 1 ½ hours. Let stand at room temperature.
Run knife around cake sides. Carefully invert 1 cake onto plate (cake is very tender); peel off parchment. Spread with ½ c. frosting. Invert second cake onto palm of hand. Position cake 2 inches above frosted cake layer. Carefully slide cake onto first cake layer. Peel off parchment. Spread cake with ½ c. frosting. Repeat with third cake layer. Spread remaining frosting over top and sides of cake.


Thursday, September 8, 2011

Easy Beef and Broccoli Stir Fry

I made this recipe so long ago.  I don't remember much about it except that Lynnette and I both made it on the same night, and we both loved it.  We found the recipe on allrecipes.com, and adapted it slightly to what we each had.  Luckily I wrote down the ingredients I used.  


Beef and Broccoli Stir Fry
adapted from allrecipes.com


3 Tbsp soy sauce
16 oz. beef broth
3 Tbsp sugar
1/4 c. flour
1 pound steak, cut into thin strips
1 tsp. minced garlic
1/2 tsp. ginger
vegetables of your choice (I used celery, red pepper and carrots)
optional: 1/4 tsp. red pepper flakes (for a little extra kick)
steamed rice


In a small bowl, combine the soy sauce, broth, sugar and flour and stir until the flour and sugar are dissolved.    In a large skillet, over high heat, cook and stir the steak strips until browned (about 2-4 minutes).  Stir in the broth mixture, garlic, ginger and vegetables.  I didn't add any red pepper flakes, but must have thought the extra kick would have been nice, because I wrote it down on my notes.  So, if you feelin' a little spicy tonight, go ahead and add that in.  Bring it all to a boil and then reduce the heat.  Simmer 5-10 minutes, or until the sauce thickens and the veggies are tender.  Serve it over rice.